
By LCol (ret) Tom Compton, CD, BA
Director, Argyll Regimental Museum & Archives
“I turned to Jock Fisher and said, “What do you think?” Jock said, “I don’t believe a word of it.” And instead of throwing our hats in the air and going out and getting drunk or something, we just waited for another order to start moving.” – Ed Youngman
“You lose your best pal and you didn’t feel like celebrating. There was something about it that morning. It wasn’t jubilant to me.” – Charles Mitchell
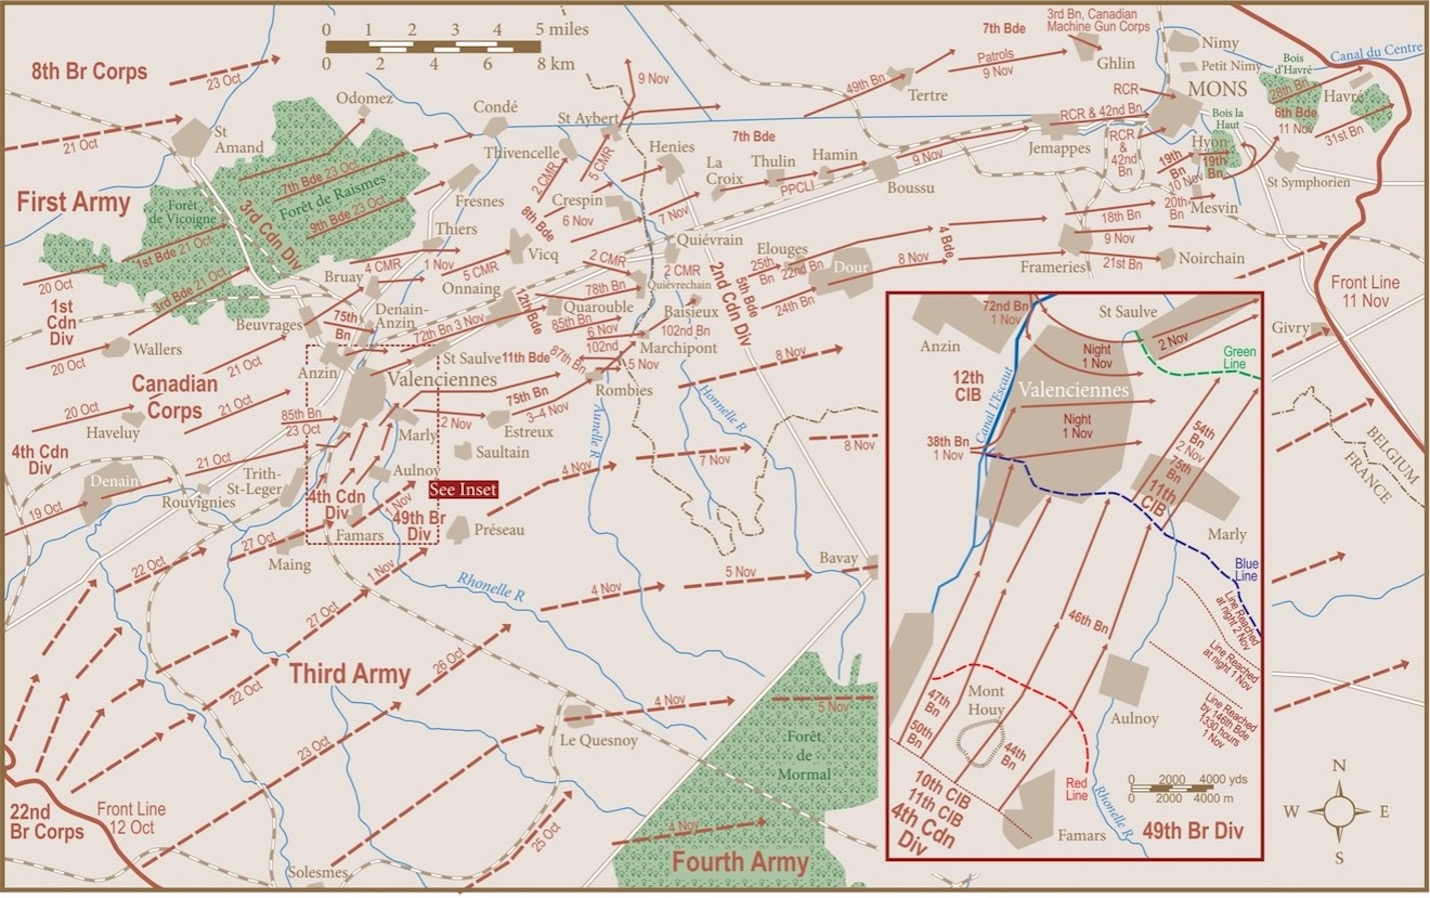
Image 1. Valenciennes and the pursuit to Mons, courtesy Dr Mike Bechtold.
By 30 October 1918, Bulgaria, the Austro-Hungarian high command, and Turkey had each signed a separate armistice with the Entente Cordiale (western Allies). Social unrest was widespread in Germany, and there had been mutinies in both the army and the navy. General Ludendorf, Germany’s wartime leader, had been sent into exile to neutral Sweden. In short, the war was rounding to a conclusion, but the only question was how quickly would Germany agree to terms for her own ceasefire and armistice? The Hundred Days Campaign was in its final stages, with British, French and American forces pursuing German forces as the Germans maintained a stubborn resistance. The 4th Canadian Division spearheaded the final set-piece attack by the Canadian Corps at Valenciennes, 1–2 November, resulting in the collapse of the defence at Mont Houy and the rapid withdrawal of German troops into successive delaying positions. The German army could not form a cohesive defensive line from here on to the end of the war.
The general pursuit had seen Lt Gen Currie’s Corps averaging three miles per day using a relatively cautious approach to avoid excessive casualties (see Image 1). For the 19th Battalion, what had begun at Marcelcave and had continued at Cambrai and Rieux-en-Cambresis, concluded with their portion of the campaign outside of Hyon, Belgium. Maj Harry Hatch was temporarily in command of the 19th, while LCol Millen was acting Brigade Commander. Millen returned to the 19th for a couple of days and prepared to go on a planned bit of leave effective 8 November, not knowing how soon the war would end. Hatch assumed command of the 19th again and 4 CIB took over the lead for 2 Canadian Division on 9 November. Their objective was the dominant high ground of Bois la Haut, 2,000 yards southeast of the ancient city of Mons. It was at Mons where the British had stubbornly delayed the Germans in 1914 before their epic withdrawal, and it was left to the Canadians to recapture this significant city and the surrounding terrain.
the 4th Canadian Infantry Brigade took over the lead for 2nd Canadian Division on 9 November. The 18th and 21st Battalions were in the lead, while the 19th and the 20th were in reserve, but Maj Hatch had the battalion advance in a rather celebratory manner, with their brass band at the head advancing in columns of four. By the morning of the 10th, both the 19th and the 20th Battalions had taken over the lead, with the 19th on the left and the 20th on the right. The 19th moved in tactical formation, two up, with B and D Coys forward. C Coy moved behind the lead companies, while A Coy was farther behind and in reserve. Attached was one troop of Canadian Light Horse as a reconnaissance element and one battery of horse-drawn 18 pounder field artillery for immediate fire support.
Contact: The Initial Phase of the Action
The 19th met little resistance on the advance until Mt Erebus. The Germans had established a machine gun school in Mons, and the students and staff had used the surrounding terrain repeatedly for training purposes. With their extensive understanding of the ground, the Germans had carefully planned the sighting of interlocking machine gun positions designed to defend the approaches to Mons. B Coy from the 19th cleared Mt Erebus of enemy by 1030 hrs, but any movement beyond became obviously too dangerous. The Germans had sighted a machine gun nest in a cemetery that was very difficult to dislodge. The schematic diagram at Image 8 allows the reader to imagine the mutually supporting and interlocking arcs of machine gun fire that held up the 19th. Any approach to the cemetery would have been covered by observation and fire of the Germans from Bois la Haut and Hyon. The distances involved meant the respective machine gun positions were well within effective firing range and could easily protect one another (compare Images 7 and 8 to understand the distances and interlocking fire). Maj Hatch eventually moved to a position of observation of the approaches to Hyon from the area of Chasse Royale (visible on Images 7 and 8). However, D Coy was consequently thwarted in four daylight attempts to capture the cemetery. Finally, the cemetery was targeted by artillery dislodging the Germans, which allowed D Coy to capture the position in their fifth attempt. A small part of the defensive positions around Hyon was now in the hands of the Canadians, but the German machine gun crews had caused the vast majority of casualties in the 19th Battalion that day.
Patient Infiltration: the Second Phase
Hatch heeded the instructions of his higher commanders to avoid unnecessary casualties and decided to pause, allowing him to synchronize the next phase of his deliberate attack on Hyon. Hatch called in heavy artillery on the German positions on Bois la Haut between 1600 and 1630 hrs, encouraging the Germans to withdraw and allowing Hatch to wait until dark (see Image 9). C Coy next sent three patrols into Hyon at 2300 hrs and found the Germans had withdrawn. Once word was passed back, Hatch sent A Coy around and up onto the Bois la Haut feature at approximately 0200 hrs on 11 November. This allowed the 20th Bn to pass through to the town of St-Symphorien to the east of Mons. Concurrently, C Coy of the 19th pushed through Hyon and beyond to just east of Mons, where they met troops from the 3rd Cavalry Brigade. A Coy continued its advance along the high ground to the east, where they occupied Mt Panisel approximately 0300-0400 hrs on 11 November. Now, with C Coy acting as his forward screen and A Coy providing overwatch to the east on high ground, Hatch moved the remainder of the 19th into Hyon at 0700 hrs, setting up his headquarters in the chateau. The Bois la Haut had been the major obstacle to 4 CIB, but with it cleared of enemy troops, 2 Cdn Div was able to continue the advance.

Image 6. Detail of a terrain map issued to troops in 1918, depicting Mont Erebus in grid square Q19c; Bois la Haut in grid square Q21b; the cemetery in grid square Q20b; the city of Mons in the north; and Hyon in grid square Q14d. The dominant ground of Bois la Haut is emphasized, as is Mont Erebus. Compare this map to the modern Google views in Images 5 and 6. Each grid square is 1,000 yards. Map Sheet 24, courtesy McMaster University, Archives and Research Collection.
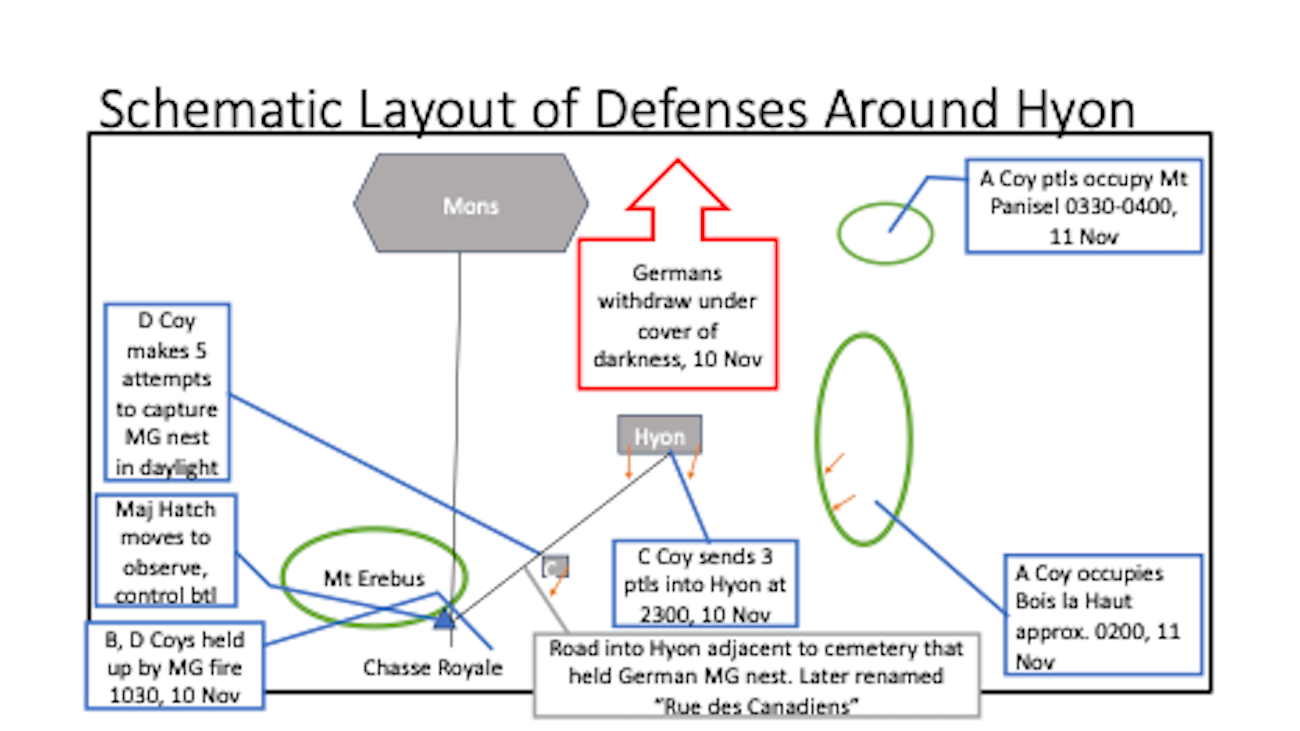
Image 7. A schematic layout of the defences around Hyon and the significant features. Compare this layout to the terrain map at Image 7.
The End of Hostilities
At approximately 0800, a message was received at battalion headquarters that a ceasefire would take effect at 1100 hrs and all units were to hold fast on their positions at that time. Shortly after 1100 hrs, Maj Hatch called up the pipe band to lead a triumphal procession through the streets of Hyon to celebrate the Armistice. Lt Charles C. Mitchell wrote:
“We kind of stood around and didn’t know what to make of it. The Armistice was on and the war was over and you couldn’t realize that anything like that could happen. You were hypnotized. You just couldn’t realize anything. I mean you were wondering what it was all about. You were fighting the day before, and men being killed, and the next day the war is all finished. Things went through your mind like that. It was impossible to realize that the war was over.”
Ed Youngman admitted he and the other long serving members of the battalion were cynical:
“General Burstall read out the proclamation. I turned to Jock Fisher and said, “What do you think?” Jock said, “I don’t believe a word of it.” And instead of throwing our hats in the air and going out and getting drunk or something, we just waited for another order to start moving.”
L/Sgt Percy James had served with the 19th Battalion since its formation in Toronto in 1914. His mail home is spotty during the 19th’s advance toward Mons, Belgium, but by 2 December 1918, the war is over and he points out to his family, “This armistice has certainly got you people excited but still we have got to keep going till they get peace [illegible] that their [sic] is no celebration for us yet: as matter of fact, it took from Monday [the 11th] morning till Tuesday [the 12th] night before we were sure that there was an armistice.” This is typical of James, who was reluctant to boast or overstate the situation at the front and preferred to take a more practical view of events.
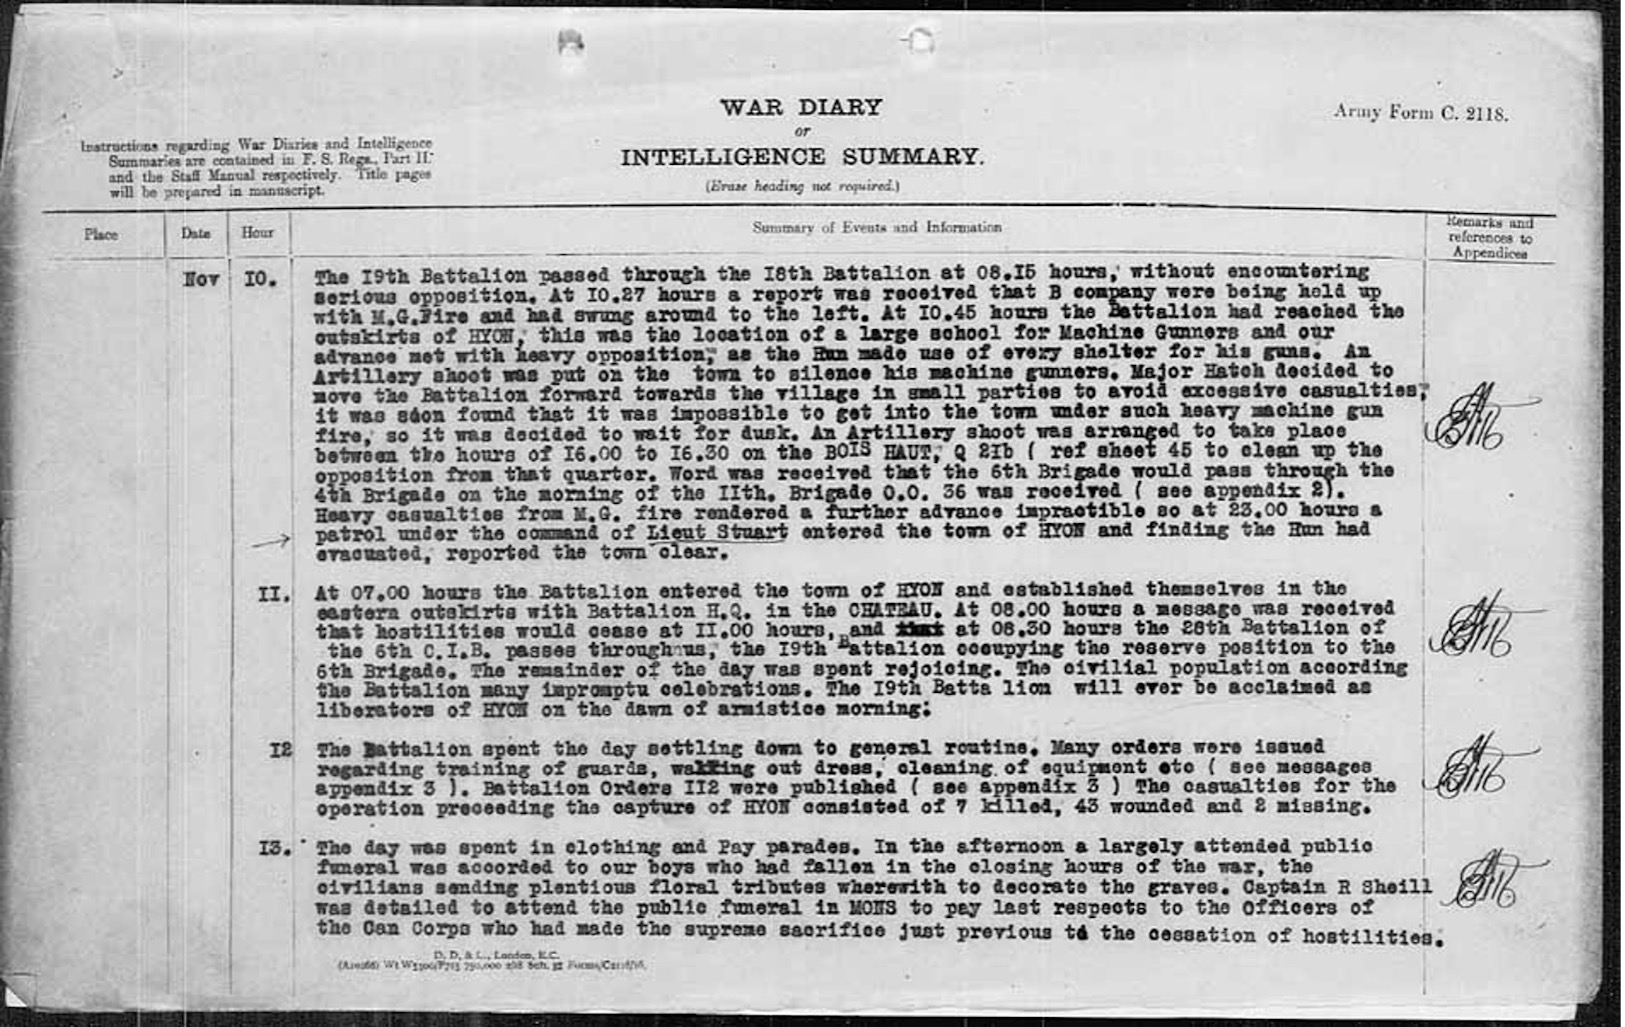
Image 9. Extract from the 19th Bn War Diary, describing the 19th Battalion’s actions 10 and 11 November 1918, including the news of the cessation of hostilities as of 1100 hrs on the 11th. Source: Library and Archives Canada.
While crowds of soldiers and civilians rejoiced, others mourned the deaths of comrades whose loss seemed harder to bear because they were struck down so close to the end. The horrible irony of Hyon hung over any celebrations of the war’s end. The 19th Battalion had sustained a total of 52 casualties in its final action, including three officers and nine other ranks killed and one officer and two other ranks who later died of their wounds. Lt. Charles Mitchell wrote about his close friend, Lt. Wesley Clarence McFaul: “This chap, Clarence McFaul, he and I chummed together and I married his sister after I came back. Well, I’d just got word that he’d been killed and it was very sad. You lose your best pal and you didn’t feel like celebrating. There was something about it that morning. It wasn’t jubilant to me.”
For a list of all those killed in action on 10 November, or who later died of wounds, please see the individual memorials for the following at this link:
LIEUTENANT WESLEY CLARENCE MCFAUL
CORPORAL JOHN ABRAHAM SIMON
PRIVATE WILLIAM ALFRED BELL
PRIVATE JAMES CLARENCE BUTTIMER
PRIVATE WILLIAM CHOWNS
PRIVATE PATRICK JOSEPH CRONIN
PRIVATE WILLIAM HALES
PRIVATE HERBERT HOWARD
PRIVATE JOHN STANLEY MALZARD
PRIVATE GILBERT SHEWFELT
CAPTAIN MAURICE CAMERON ROBERTS, MC
LIEUTENANT CECIL EWART GLADSTONE ROBERTSON
LIEUTENANT WILLIAM WILFRID COPELAND
SERGEANT ALEXANDER CRAIG, DCM
PRIVATE CLIFFORD JENNINGS
PRIVATE WALTER CURRY
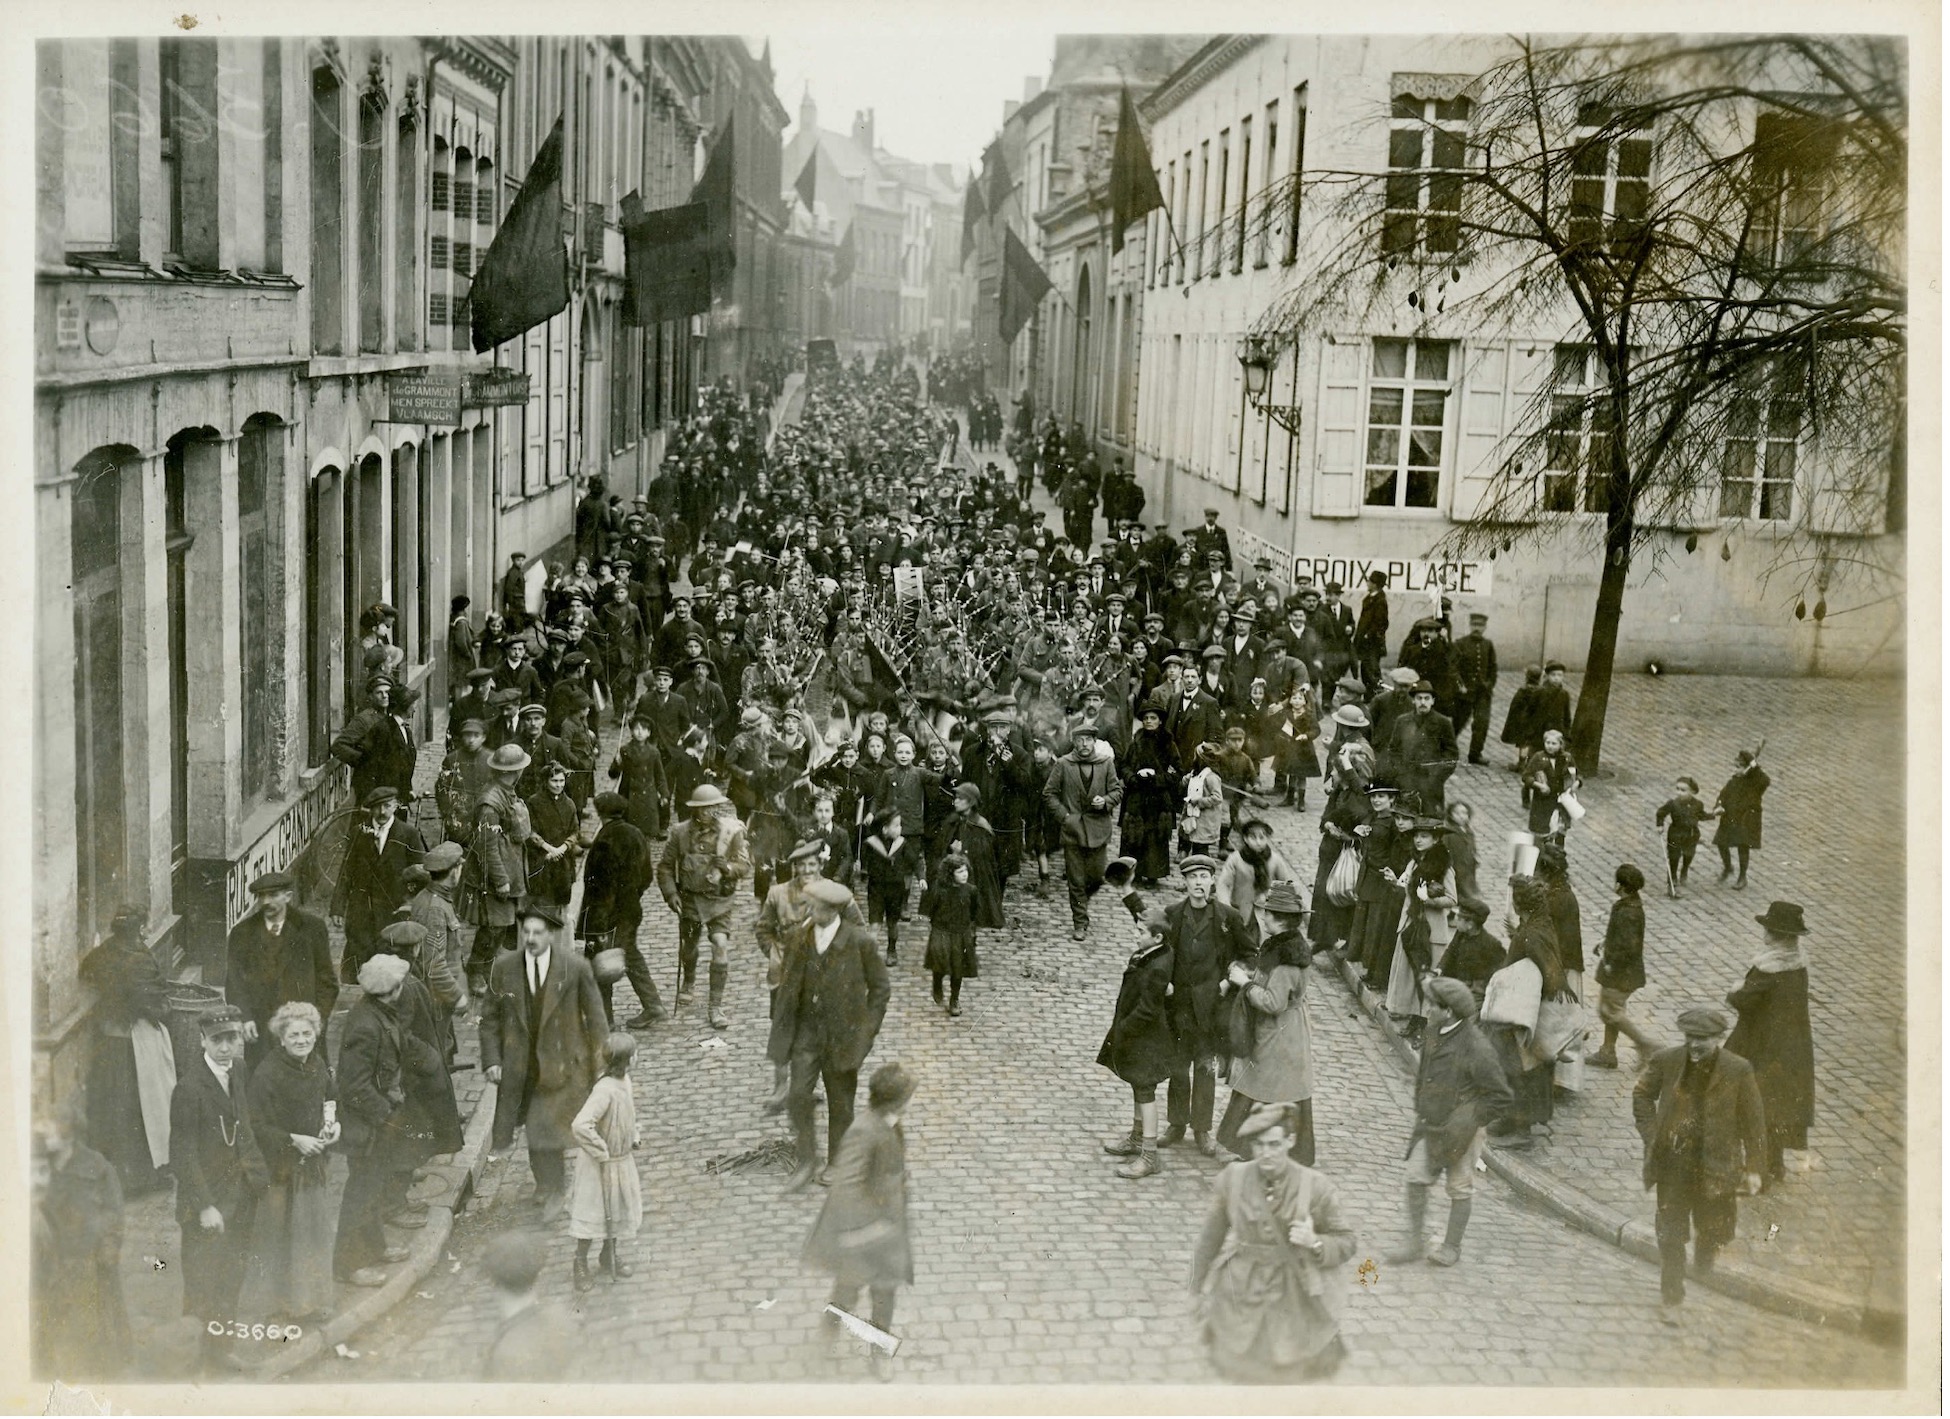
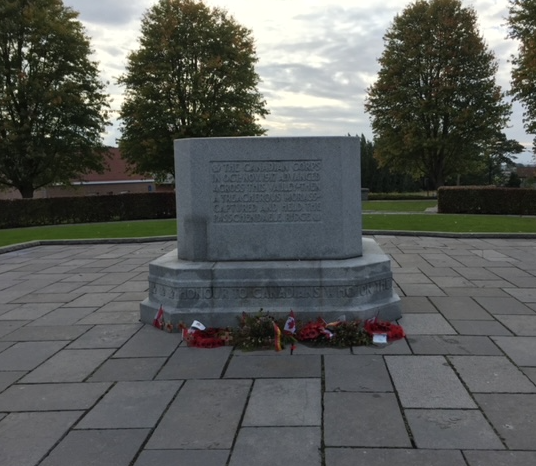
Image 10. Canadians celebrate the end of the war in Mons with jubilant locals. Source: Canadian War Museum.
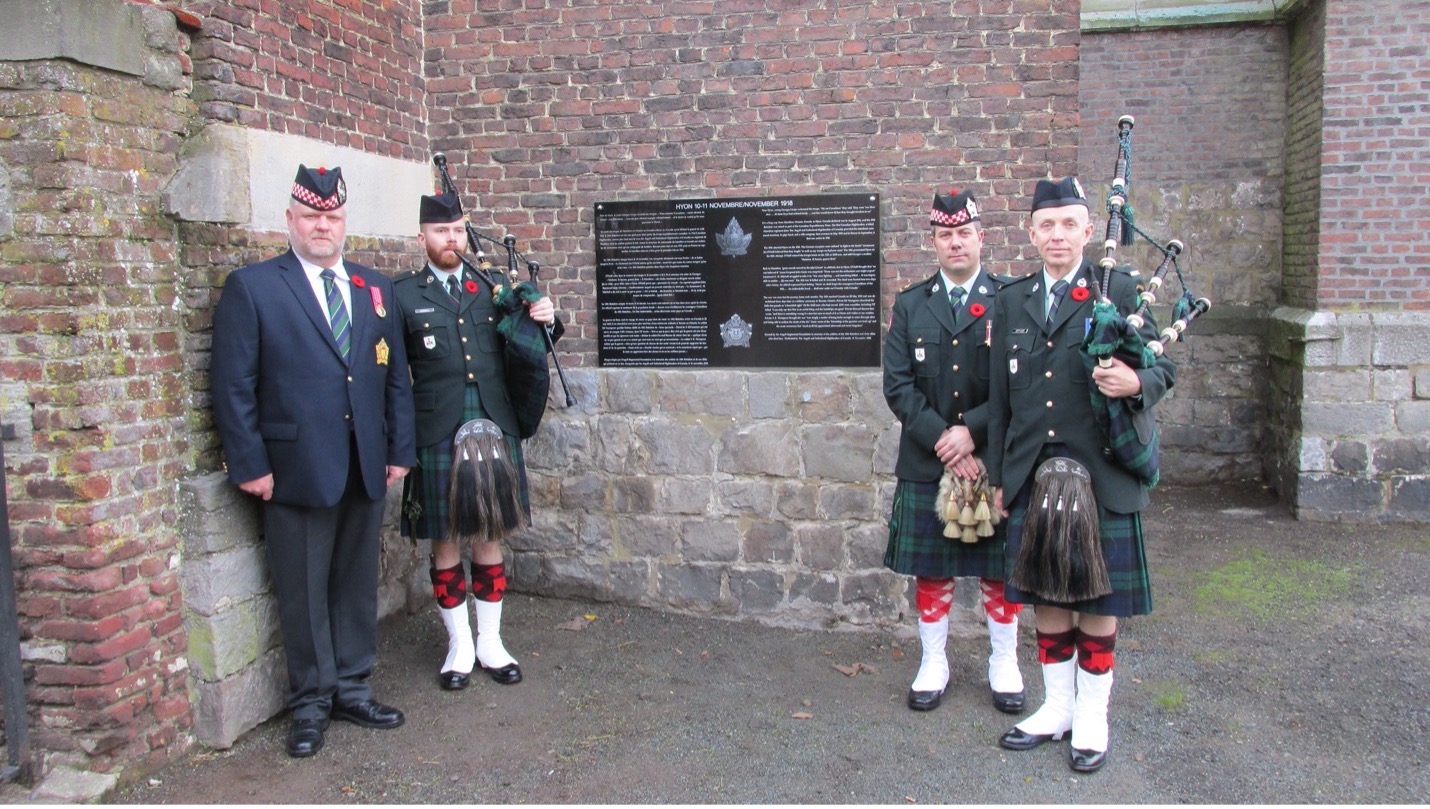
Image 13. The memorial plaque mounted on the church. From left to right: WO (ret) Colin Drake, Cpl Jazz Kersell, Maj Adam McInnis, Pte Officer. Courtesy Maj Adam McInnis.
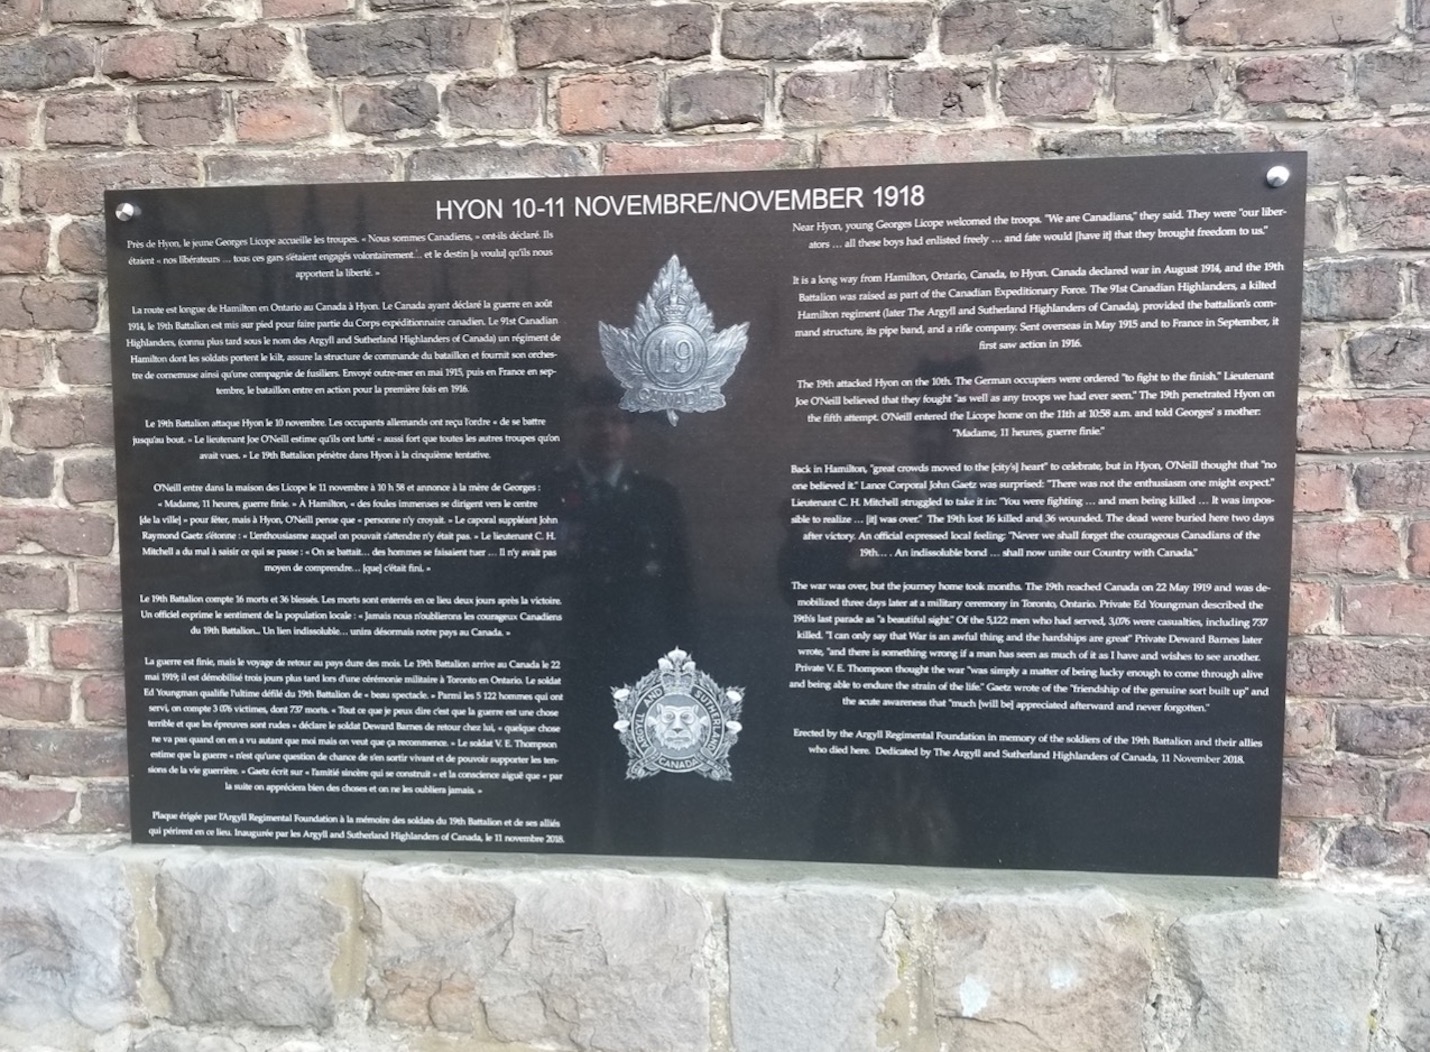
Image 14. The memorial plaque dedicated to the 19th Bn, erected by the Argyll Regimental Foundation in 2018. Courtesy Maj Adam McInnis.
References
Special thanks to Dr David Campbell for his book It Can’t Last Forever: The 19th Battalion and the Canadian Corps in the First World War (Waterloo, Ont.: Wilfrid Laurier University Press, 2017), from which details of the action are sourced.

Image 2. LCol Lionel Millen, Commanding Officer. Argyll Regimental Foundation collection.
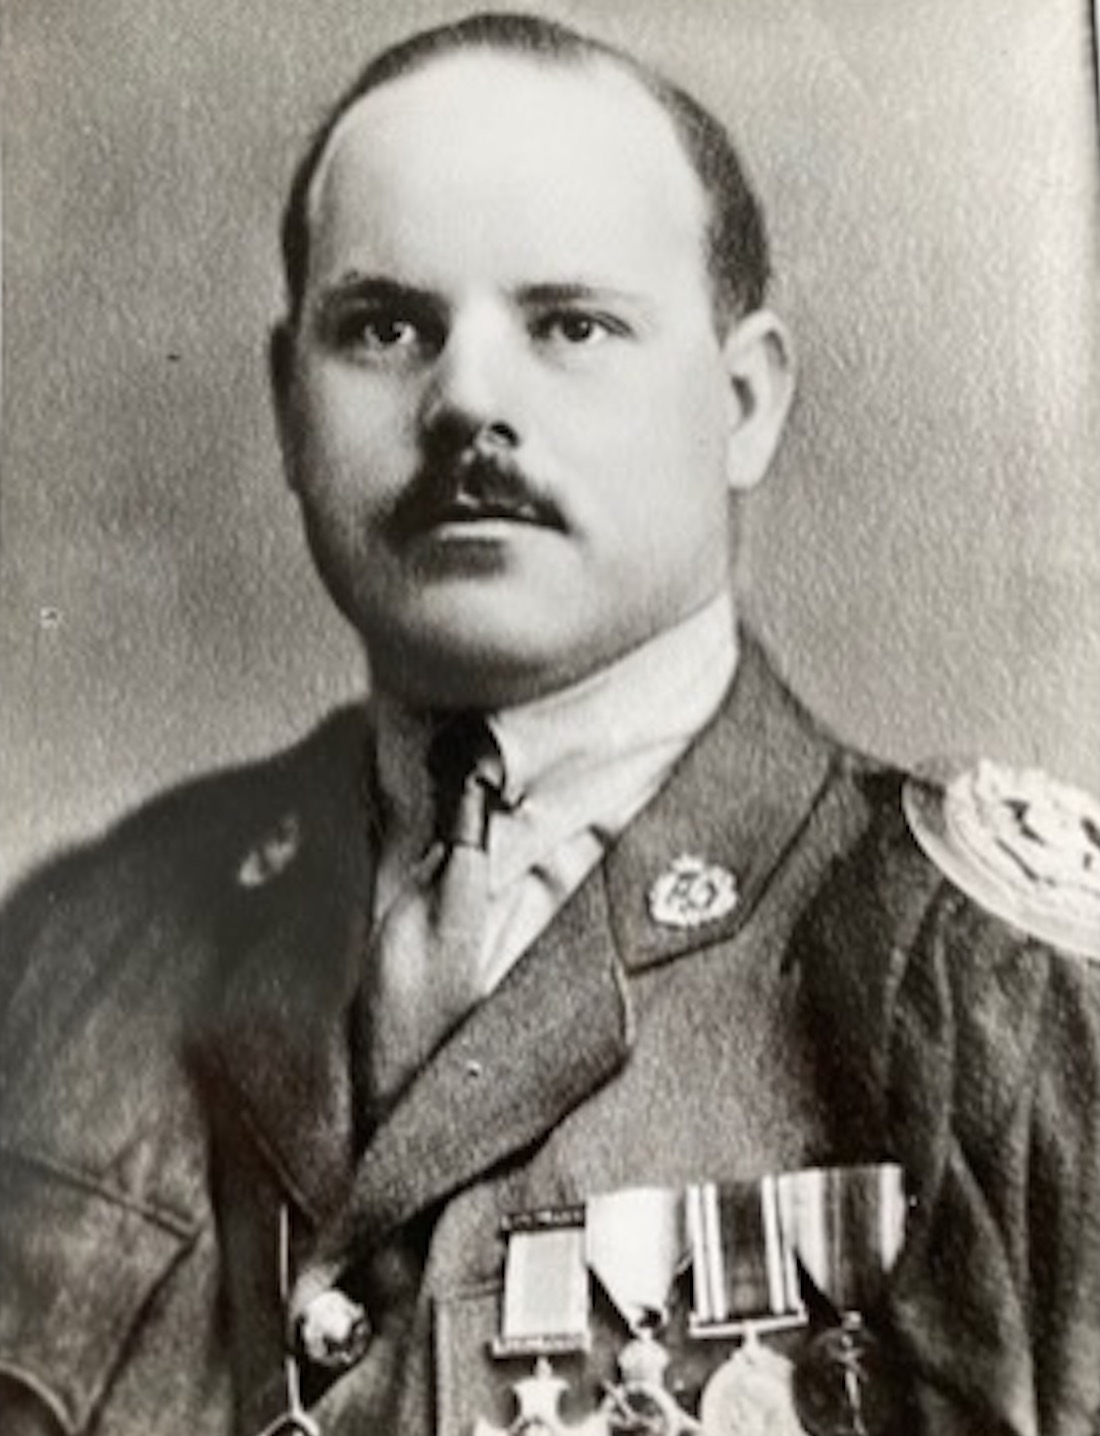
Image 3. Maj Harry Hatch commanded the 19th Bn during the final action at Hyon. Argyll Regimental Foundation collection.
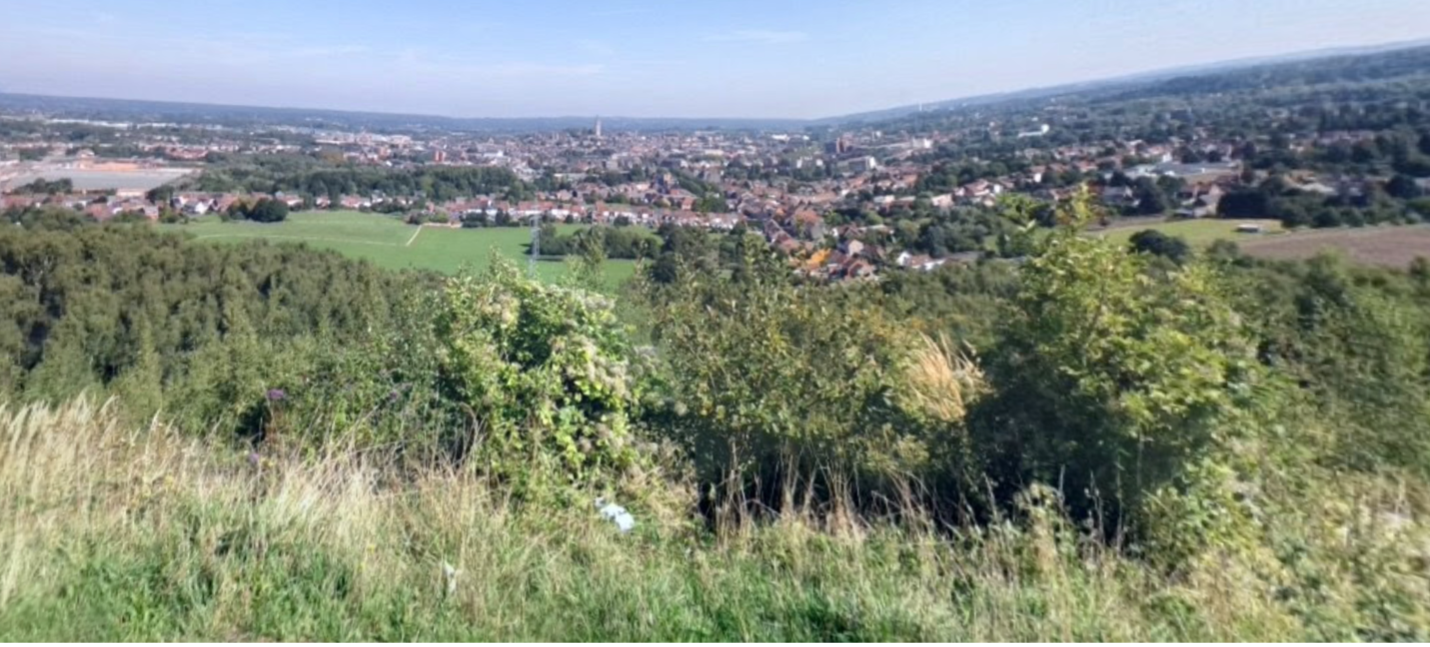
Image 4. Looking north from Mt Erebus towards Hyon. It was likely from here that elements of the 19th could establish a position of observation and allow Maj Hatch to synchronize the movement of the 19th Bn companies, as well as calling in artillery fire on machine gun positions. The modern-day Google Maps tool allows us to visualize the terrain, what was observable and what was not, depending on the location of the Google Maps camera. While trees and buildings may change, the landscape, including hills and valleys, do not. The Hyon church spire, in this position in 1918, is just visible in the distance. The high ground known as Bois la Haut, on the right, contained German machine guns that rained down fire on 19th Bn troops. Source: Google Maps, 2016.
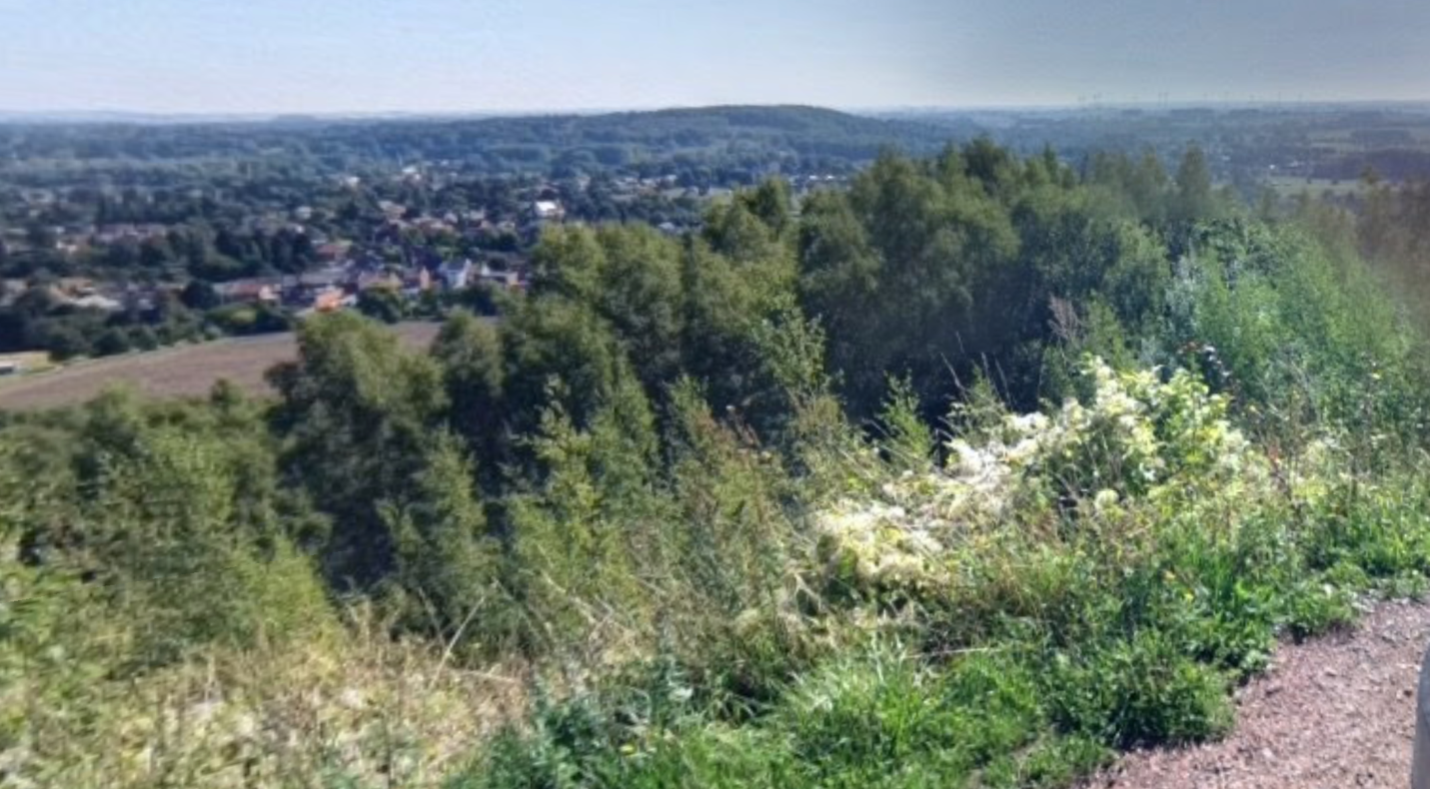
Image 5. Looking east from Mt Erebus towards Bois la Haut. The dominant ground of this feature is visible, and it is easy to understand how German forces could observe, direct fire from this location, and prevent the 19th Bn from advancing on Hyon. Source: Google Maps, 2016.
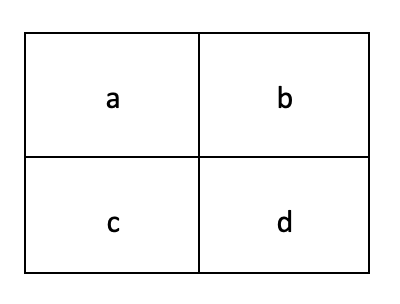
Image 7B. How to read First World War map coordinates: This grid represents Sheet 24, Sector Q, grid 21. The grid square is further broken down into quarters depicted as “a, b, c, d”. The Germans were targeted in grid square Q21b by heavy artillery the afternoon of 10 November. Heavy artillery is an area weapon, which means by targeting Q21b the 19th Battalion was ensuring the entire designated grid reference was pummelled for 30 minutes.
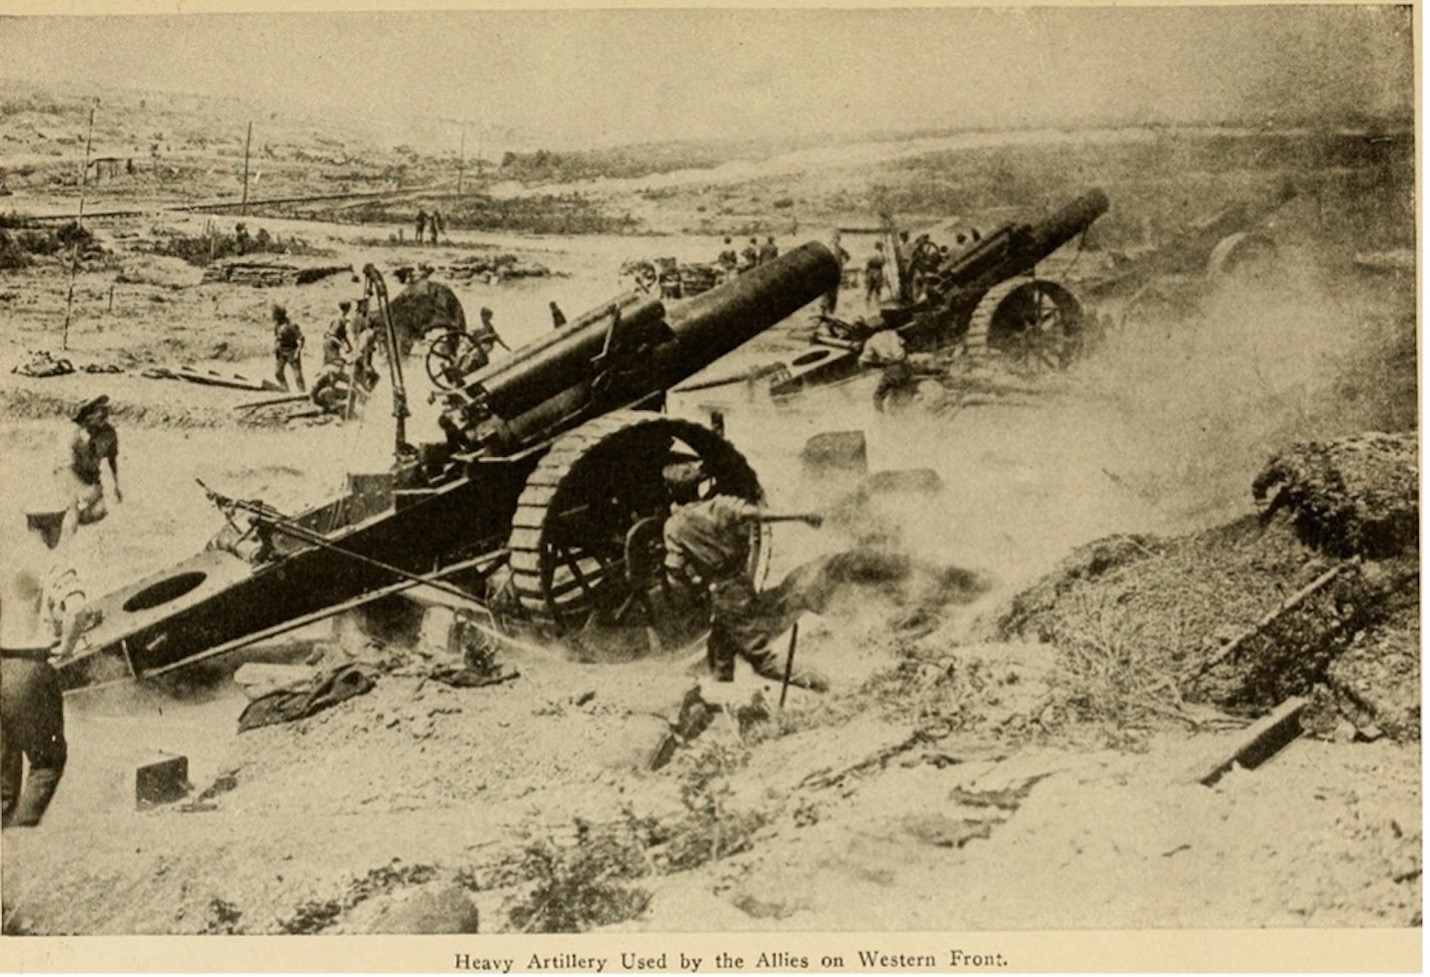
Image 8. Three 8-inch heavy artillery guns in action. Heavy artillery, like the guns pictured, was used to dislodge the Germans on the Bois la Haut, 1600-1630 hrs, 10 November, 1918. A half hour of fire from these massive guns would be a terrifying experience to those on the receiving end. Image: Wikimedia, from The People’s War Book History: Cyclopedia and Chronology of the Great World War.
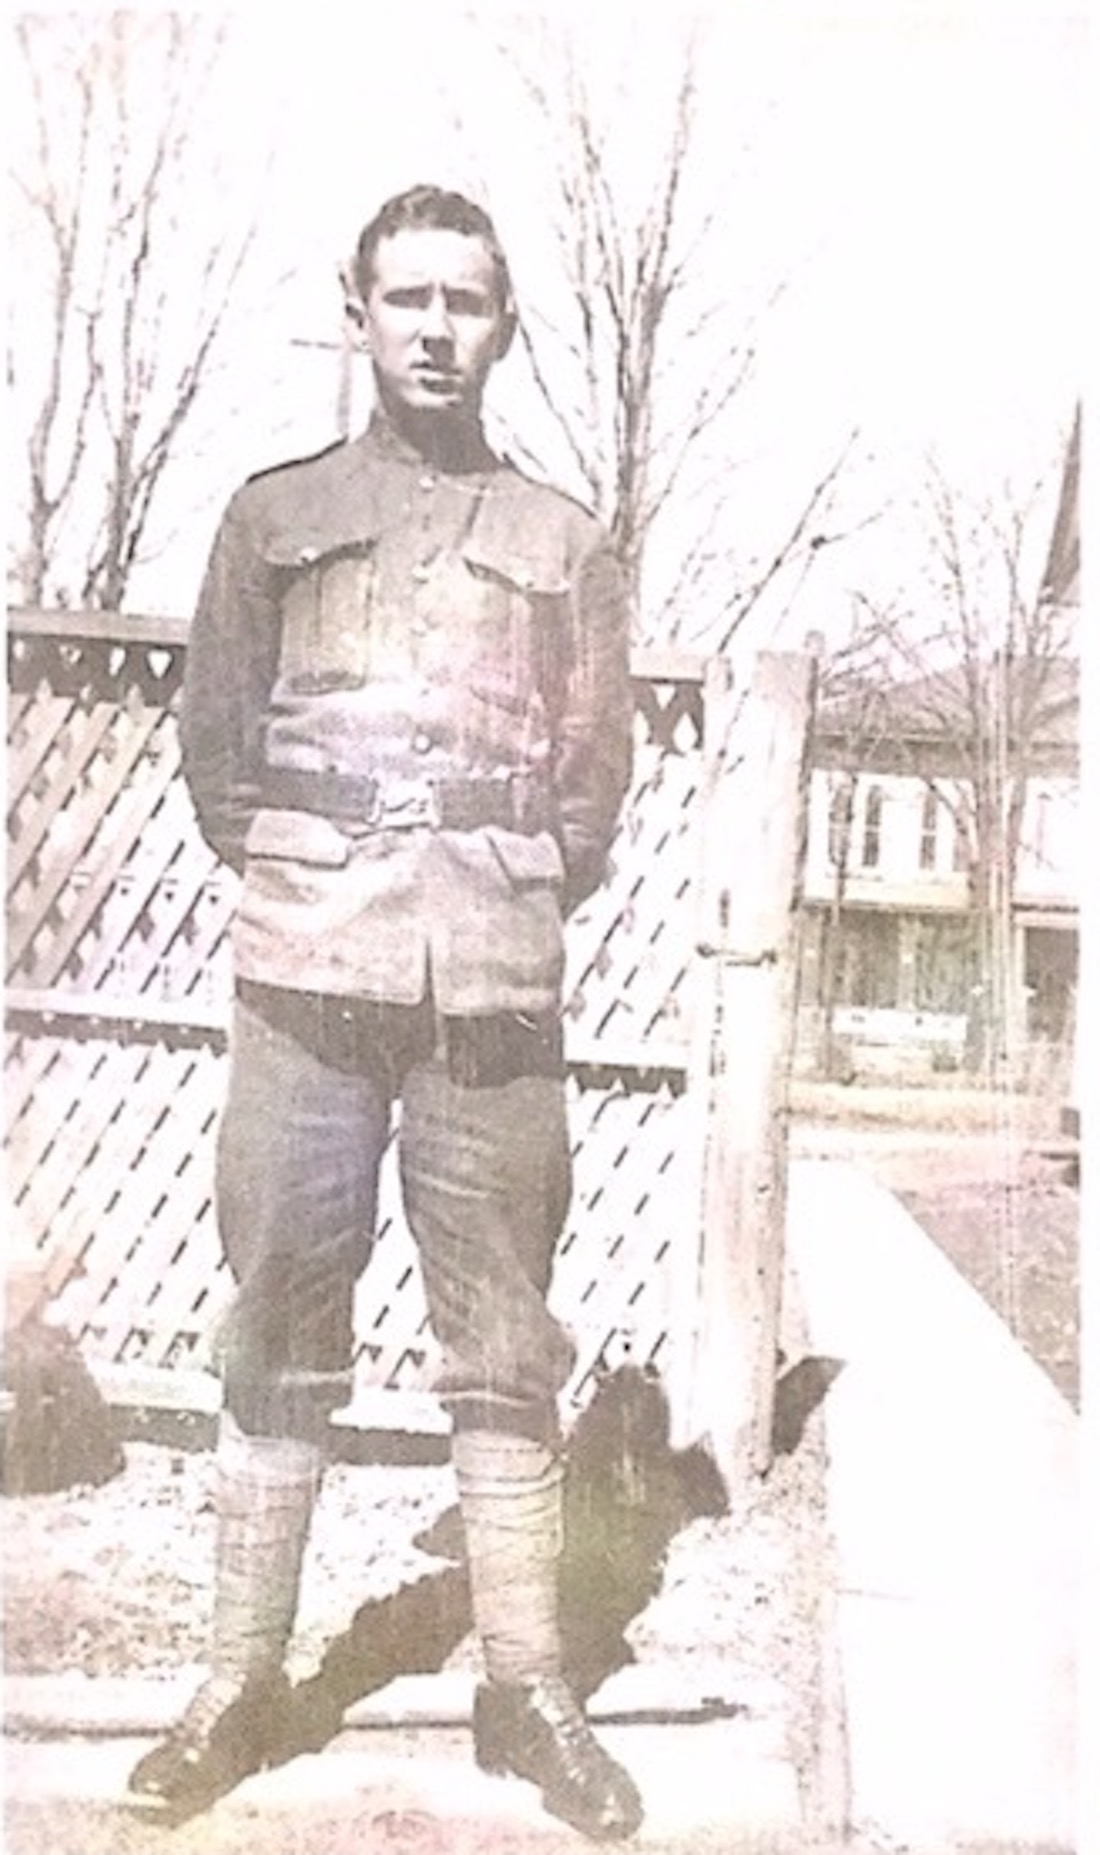
Image 11. L/Sgt Percy James was a member of the 19th Bn from 1914 through to 1919. Argyll Regimental Foundation collection.
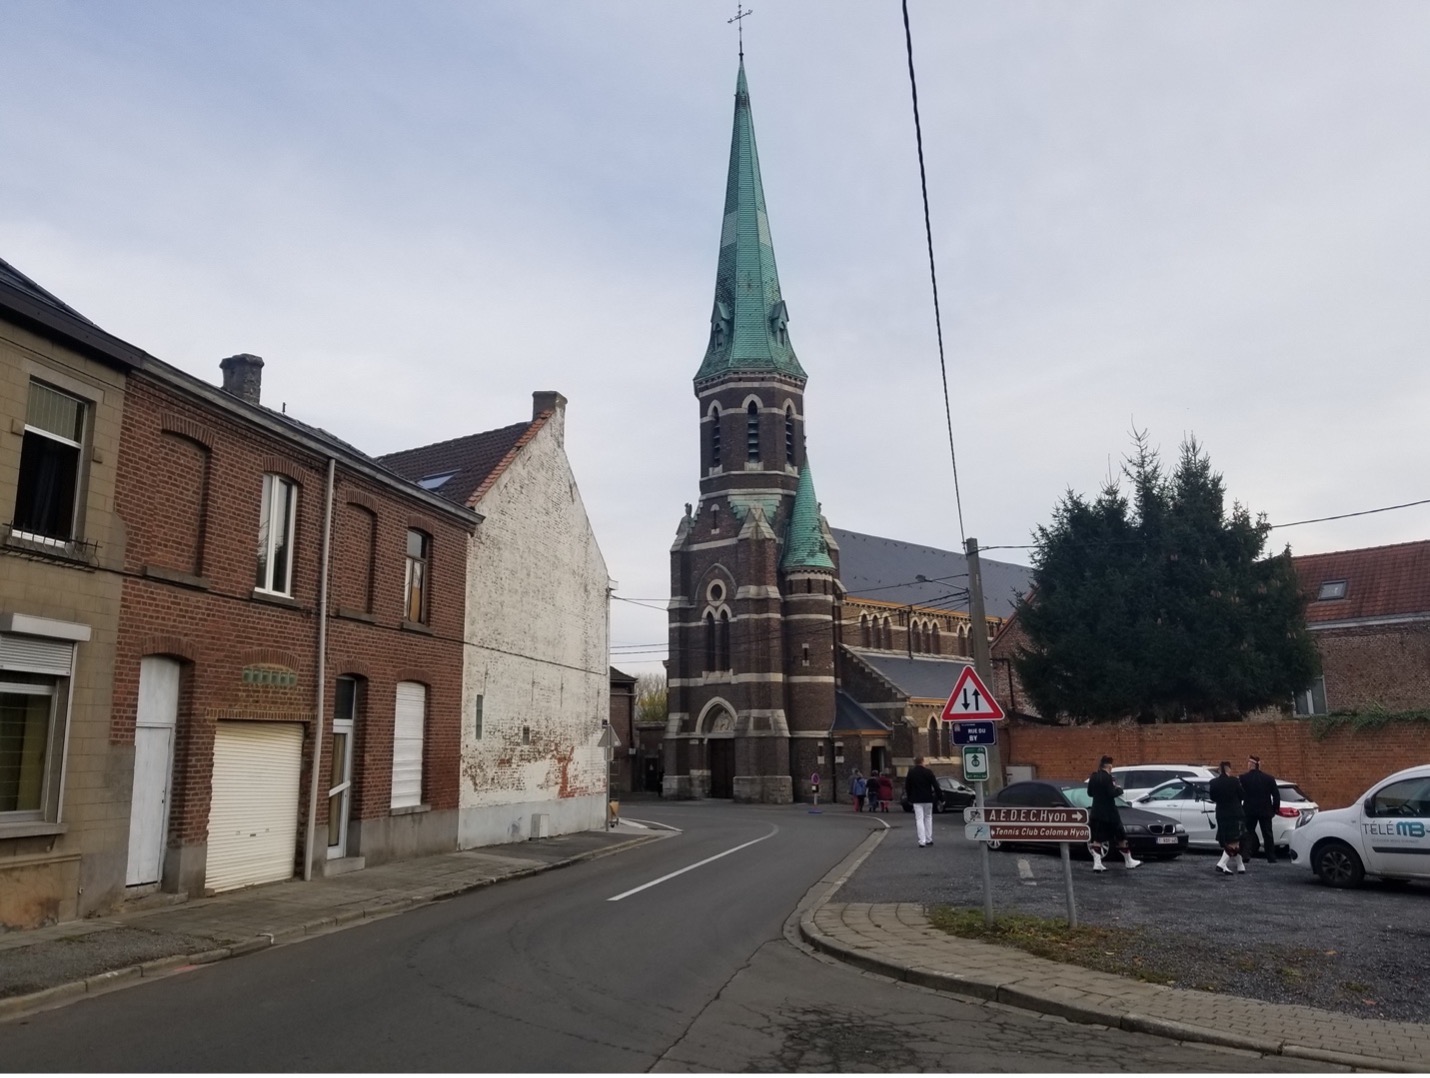
Image 12. The Eglise Saint-Martin d’Hyon, where a memorial plaque to the 19th Bn is located. The spire of this church is visible in Image 5 above, and would have been visible to Maj Hatch in 1918, when he surveyed the battlefield from Mont Erebus/Chasse Royale. Courtesy Maj Adam McInnis.