Marcelcave, 8 August 1918
The Beginning of the “100 Days Campaign” for the 19th Battalion
LCol (ret) Tom Compton, CD, BA
Director, Argyll Regimental Museum & Archives
The German offensives in mid-1918 were the last attempt to regain the initiative before the masses of American infantry, arriving at a rate of 250,000 troops per month, were in France in overwhelming numbers. The Allies sought to exploit the German weaknesses by launching their own offensive, and the overall Allied commander, General Foch, ordered an offensive to begin no later than 8 August 1918. The Australian and Canadian Corps were to lead the assault, and great attempts at secrecy were made to deceive the Germans as to the Allies’ intent. Canadian units were used to conduct a deception operation in the Flanders area while the remainder of the Canadian Corps were moved secretly by train, south towards Amiens. The Australian Corps extended their frontage in the Amiens area, leading the Germans to believe an attack was unlikely near Amiens. The Germans, thanks to the deception plans, thought it more likely the Canadians would attack in Flanders. Meanwhile, the Canadian Corps assembled behind the Australians, unknown to the Germans.
Tank-infantry training by the Canadians began on 30 July 1918, with Maj Harry Hatch (see image 1) in temporary command of the 19th while LCol Lionel Millen (see image 2) was on course. Training continued and LCol Millen rejoined the battalion on 3 August. In a series of night marches, the 19th moved to Cagny and then to a wooded assembly area near Bois d’Aquennes, to the west of Villers-Bretonneaux (see image 3).
The Ground
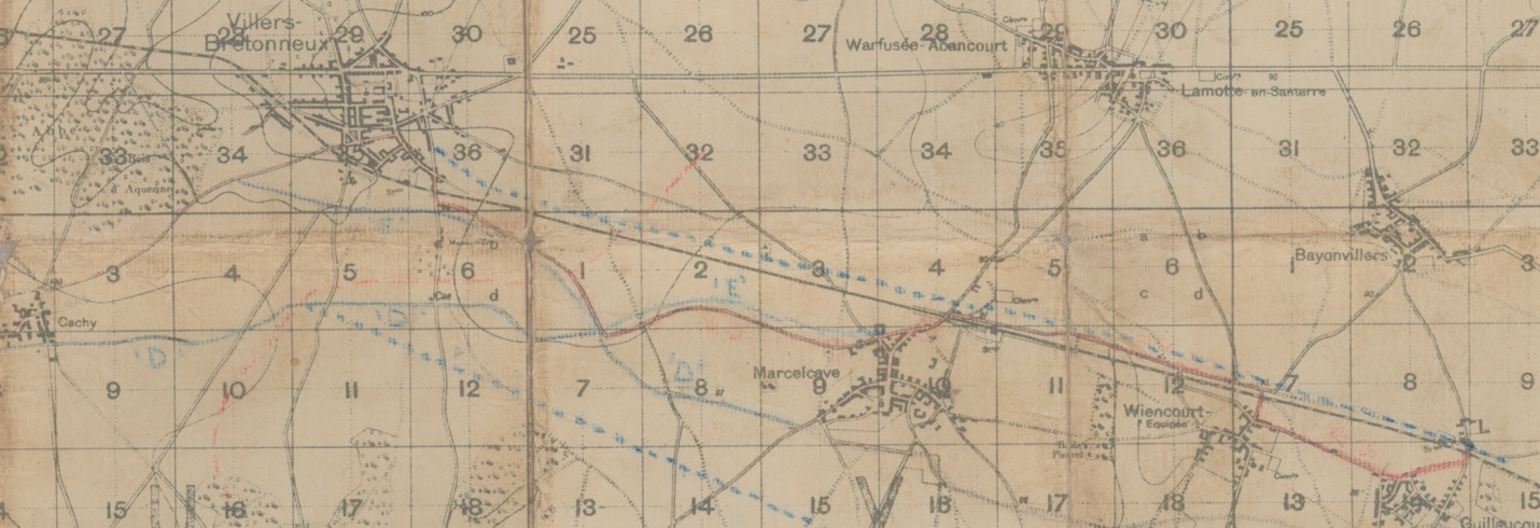
Image 3. The Bois d’Aquennes and Villers-Bretonneaux are visible in the upper left corner of this original battlefield map issued to troops for the assault. The blue dotted pencil crayon lines on the map follow the direction of attack of the 19th Bn, although the markings for “D” and “E” do not correspond to the 19th Bn. (McMaster University Archives and Research Collections.)
The 4th Canadian Infantry Brigade (CIB) issued orders to its battalion commanders on 6 August while preparations continued. The 19th issued its own orders to the troops on the 7th, based on the plans drawn up by 2nd Canadian Division and 4 CIB. The 18th Bn was on the 19th’s right, while a well-defined railway line identified the 19th’s left boundary and also defined the Canadian Corps’ boundary with the Australians (see image 4). The terrain was flat and interspersed with villages, crop fields, and woods. The fields of fire were consequently wide and open.
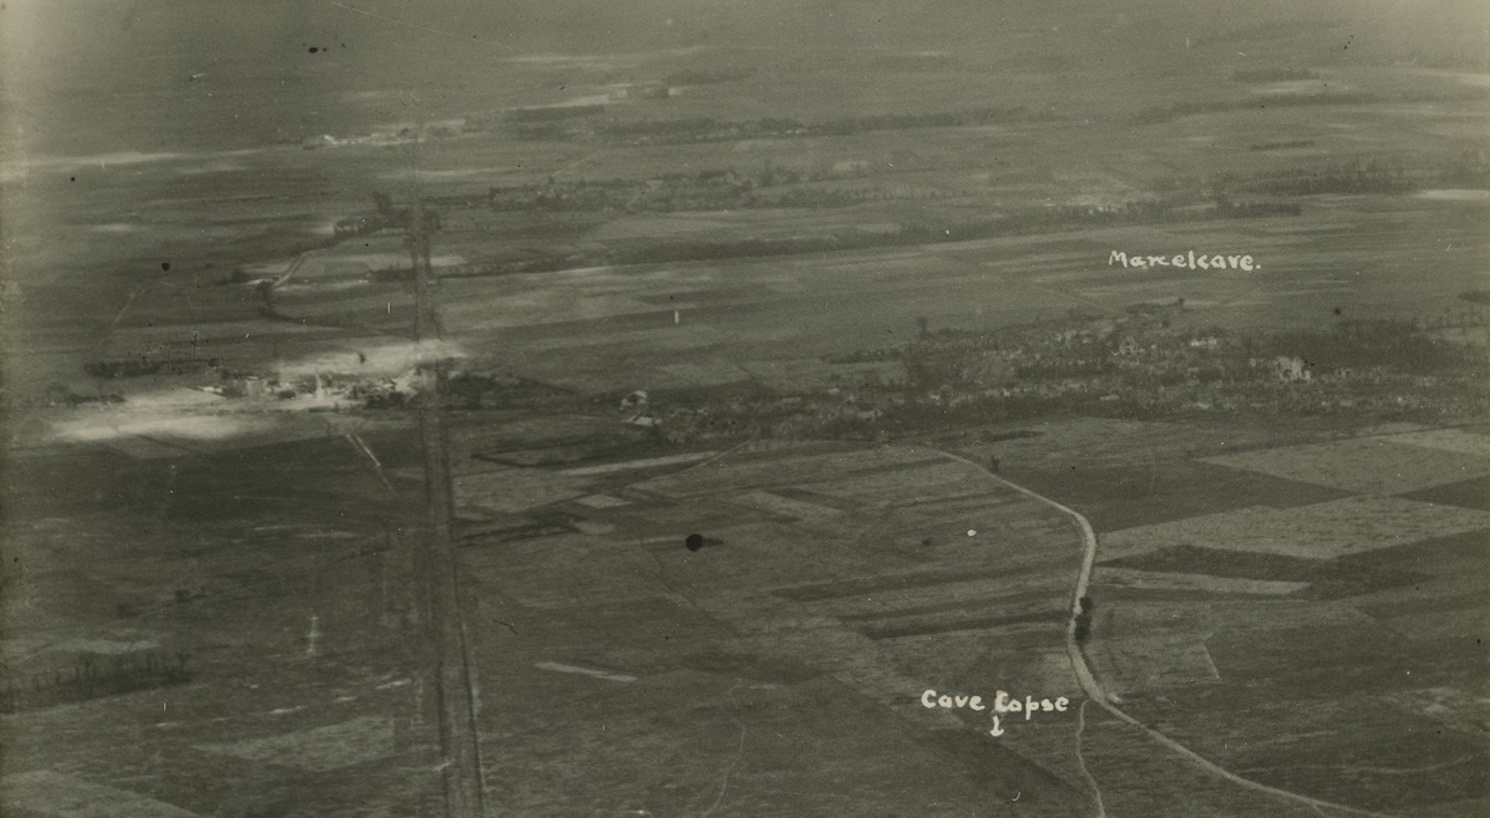
Image 4. RAF aerial reconnaissance photo taken in the weeks prior to the battle. The rail line that marked the 19th’s left boundary as well as the Canadian Corps’ boundary with the Australians is quite visible as it extends east from the bottom left of the picture. The town of Marcelcave is quite visible and marked on the right. This is the terrain across which the 19th attacked on 8 August 1918. The position from which the photo was taken approximates the start line of the 19th. Their objective, Green Line, was half a mile beyond the town of Marcelcave. McMaster University Archives and Research Collections. (See also image 5.)

Image 5. The Canadian Corps’ direction of attack, 8-18 August 1918. Note Villers-Bretonneaux and Marcelcave in the upper left of the map. Courtesy of Dr Mike Bechtold.
The Supporting Combined Arms
The Canadians were heavily supported with tanks, artillery, mortars, machine guns firing in the indirect role, and No. 5 Squadron, RAF, dropping smoke and phosphorous to mark targets. The 19th was assigned seven tanks from the 14th Tank Battalion and four Stokes mortars as intimate support. The 18th, 19th, and 21st battalions were assigned to take Marcelcave and expected the assault to be a tough fight. LCol Millen organized the attack with three companies up. From left to right were B, A, and C companies, with D company in reserve.
There was no preliminary bombardment by artillery, but at H-Hour, 0420 hrs, 8 August, the 646 field and heavy guns assigned to the Canadians opened up and continued to lift their barrage 100 yards every three minutes. The Canadians had trained prior to the attack to advance with a platoon behind one of the massive tanks as cover. Once engaged with the enemy, they were to break down their movement into coordinated fire and manoeuvre using the weapons integral to the company and platoon as a fire base while soldiers advanced under cover fire. The tanks were then to engage pockets of resistance with fire and the crushing weight of their tracks on defensive positions. Communication with the rear was difficult, but each company lay fragile telephone wire behind them while the RAF observed and marked progress with smoke and artillery targets with phosphorous. These are remarkable examples of how far the coordination of the various arms had progressed to this point in the war, but the individual infantry junior officers and NCOs had to integrate all these supporting elements in a chaotic fight as they advanced and led their soldiers through their objectives – firing, fighting hand to hand, and throwing grenades at the entrenched enemy.
The Attack
Deward Barnes wrote in his journal that prior to the advance:
“…the Germans must have got wise, because we were not too quiet…. His batteries opened up and he made an awful mess of us. A large number of us were wounded or killed.”
Prior to H-Hour, a mist had settled on the battlefield, making observation difficult, no more than 100 yards. This may have helped the Canadians as they advanced but may have also hindered their ability to identify targets, with the result that attacking troops stumbled into pockets of Germans huddled in their positions. Close-quarter fighting would ensue, and it is at this juncture of the battle that the Canadian troops would encounter German troops in the act of surrender or they may have fought to the end as a Canadian soldier shot them, bayoneted, or chucked a grenade at the adversary. Deward Barnes recalls a comment made by LGen Arthur Currie, at a parade prior to the battle, to not take prisoners. British historian Hugh Sebag-Montefiore has suggested that the Commanding Officer of the 21st Bn ordered the killing of prisoners. BGen Tuxford, commanding 4 CIB, encouraged his troops to remember Llandovery Castle (see image 6). Dr. David Campbell, author of It Can’t Last Forever: The 19th Battalion and the Canadian Corps in the First World War, notes “…the sinking of the Canadian hospital ship, Llandovery Castle, [was] earlier that summer in 1918. Troops had been told that U-boat crewmembers had gone so far as to machine gun survivors of the sinking as they struggled in the water, including Nursing Sisters” (see image 7).
Dr. Campbell, in answer to the comments by Hugh Sebag-Montefiore, suggests:
“I didn’t see any official order to take no prisoners before the Battle of Amiens on 8 August 1918. If I had found any such order in writing from 4 CIB, I would have quoted and cited it. But based on anecdotal evidence in published and unpublished primary sources, it was something that some officers took it upon themselves to tell their men, and the men themselves sometimes decided in spur-of-the-moment fashion during the heat of battle to execute enemy troops.
“I’m not arguing that such stories necessarily justify ruthless behaviour by Canadians, but it’s necessary to know the context. Sometimes a German machine gun crew would blast away with their weapon to virtually the last second, at which point if it became apparent that their position was going to be overrun, they might throw up their hands and attempt to surrender. Not surprisingly, the surviving Canadian infantry who reached the MG nest sometimes (often?) were in no mood to take them prisoner.
“And on the other side of the coin, there are other occasions of Canadian troops sharing their water bottles with wounded Germans, and prisoners being used to carry back wounded Canadians. Basically, every kind of action that one might conceive would have happened in the chaos of the battlefield, and Canadian troops were no different than those of other nations in displaying all manner of selfless and ruthless behaviours.”
As Tim Cook, a historian at the Canadian War Museum, argues:
“It was not easy to give quarter in the heat of battle. Although prisoners were wanted, and a welcomed indicator that not every foot of the Western Front would be fought over in fanatical death struggles, it was difficult for soldiers to alternate between the frenzy of killing and the offering of mercy.
“When was the right time to surrender? For soldiers caught in the crash of first contact with the enemy, there was not much hope in giving up until the tide turned decisively in the battle. For attacking troops, terror, adrenaline, rage, and revenge were all factors that inhibited the acceptance of surrender. Most soldiers did not fight to the bitter end, but to surrender too soon meant throwing down one’s arms in the middle of fierce combat and gambling with one’s life; to wait too long, however, as was the case with machine-gunners who offered essential fire support for retreating troops, often resulted in execution by avenging soldiers. Defenders could not expect mercy after firing all of their ammunition and then throwing up their hands only seconds before the Canadians overran their positions.
“There was a universal code among soldiers seeking to surrender: weapons were downed, hands raised. Prisoners needed to show their intent clearly, and white flags were occasionally waved, but most frontsoldaten did not have access to this material in the midst of battle. The difference between life and death was fragile at best, and additional patterns of behaviour were also followed. Prisoners called out for mercy with “Kamerad, Kamerad” cadences that were common with almost all surrenders. Most prisoners handed over their personal belongings – watches, helmets, revolvers, and anything else of value — to curry favour, since they realized that they would likely be robbed blind at some point on their journey to the rear. The pitiful waving of photographs of children or wives by prisoners reminded their captors that they, too, were human. Subservience and humility were displayed to the captors who, quite literally, held the prisoners’ lives in their hands. A number of Canadians testified that seeing the ragged and terrified prisoners softened their anger and hatred of German soldiers, which had been heightened in the terror and confusion of battle. Tens of thousands of captured prisoners proved that many enemy soldiers indeed survived the surrender process.”
The 19th Bn’s Deward Barnes recalled that “… dozens of Germans put their hands up and said, ‘Mercy, Kamerad’ Some got back [to our lines], but not all; we shot them down like dogs.”
Dr Campbell concludes:
“I think the truth of the situation at Marcelcave can be stated, and any potential unease or objections might be addressed by providing the kind of context mentioned in Cook’s article and in the 19th Battalion history. The chapter on Amiens notes that the 19th Bn did end up capturing around 250 prisoners on August 8. That fact alone, as reported by the battalion war diary, can be used to rebut any assumptions that Canadians were in any way systematic about maltreating Germans who attempted to surrender.”
The fog had delayed the departure of the tanks until 0440 hrs, and as the 19th advanced, B Coy encountered heavy resistance from a German position next to the railway line. Capt Bliss had been tasked by LCol Millen to coordinate the forward companies and flanking units. Bliss sent a messenger to the Australian 21st Bn on the left, asking for assistance, and a well-coordinated supporting attack from the Australians resulted in a fierce Lewis machine gun and grenade attack (see images 8 and 9), allowing both battalions to proceed. The fluidity of the battle continued with the Australians on the left and the other battalions of 4 CIB supporting each other as they moved forward, encountered the enemy, and then cleared them out. Fighting could be fierce but was aided with the newer tools of the infantry, the light machine gun and grenades. Weapons of this nature allowed platoons or companies to lay down heavy suppressive fire as needed and facilitated fire and manoeuvre. The assault on the town saw the 19th and the 21st Bns closing in on three sides, and the 19th’s A/Sgt Hollidge “entered the town with a machine gun on his arm, firing down dugouts, cellars, up and down roads, etc.”
The members of the 19th captured a regimental commander in his dugout and helped themselves to the beverages found inside but discovered it wasn’t as good as their own issued Army rum. Meanwhile, elements of the Australian 26th Bn at the north end of Marcelcave obtained the assistance of a tank. The tank was armed with six-pounder guns and provided close support as the Australians cleared the north edge of the town.
The Australians observed German field guns positioned along Pieuret Woods (see image 5) beyond the Canadian Green Line objective and chased away the crew of a German 5.9-inch howitzer closer to the village. Then, reported an Australian officer, “behind the right rear, an uproar of shots and bombs resounded for five minutes. Then out came the Canadians, to the admiration of all, advancing as if on parade to their objective on the knuckle beyond the village.” The 19th’s objective was reported as secured by 0655 hrs. Deward Barnes records that he and his mates emerged from Marcelcave at 0710 hrs and came under immediate German machine gun fire. The tanks then moved forward and cleared out a tree line by driving up and down the woods and firing into German positions. Clearing small pockets of resistance continued for a few hours by the four battalions of 4 CIB, but Marcelcave and the Green Line objective were secure.
The advance was aided primarily by the artillery, which provided a rolling barrage and counter battery fire. The tanks were slow to move up due to the fog, but did provide material support to the Australian 26th Bn on the north edge of Marcelcave and at the end of the advance against German machine gun positions along the far tree line. The effect of the 2nd Machine Gun Battalion on the battle was not noted in the 19th’s war diary; however, they were actively engaged throughout the battle. The leadership of the infantry junior officers and NCOs was critical amidst the chaos of the battle as they skillfully coordinated local attacks and the support between elements of different battalions of 4 CIB and the flanking Australian 21st and 26th Bns. In the end, it was the infantryman’s own weapons that cleared the town – Lewis guns, grenades, rifles, and bayonets.
The cost to the 19th Bn was heavy, with 4 officers killed, 7 wounded, and 147 other ranks killed, wounded, or missing. The 4th Brigade, as a whole, sustained heavy casualties: 25 officers and an estimated 563 other ranks. On a positive note, between 900 and 1,000 Germans were made prisoner and sent to the rear.
The “100 Days Campaign” is marked by the fluidity of battle facilitated by the skilled use of combined arms, flexible leadership at all levels, and the collapsing morale of the German armies as they were unable to stem the tide of well-supplied, battle-hardened allied armies. Just two days after the success at Marcelcave, L/Sgt Percy James of the 19th Bn wrote to his parents, commenting in his typically laconic prose: “As I have an opportunity to send mail today I though[t] I had better drop you a line. … I suppose the war news will look better to Father these days.” Indeed, it was the beginning of the end, but more death awaited the 19th Battalion leading up to 11 November 1918.
Sources:
Special thanks to Dr David Campbell whose book, It Can’t Last Forever: The 19th Battalion and the Canadian Corps in the First World War (Waterloo, Ont.: Wilfrid Laurier University Press, 2017), formed the basis for this summary of the battle.
I must also thank Dr Campbell for his personal correspondence regarding the capture and sometime killing of prisoners by Canadians in the First World War.
Hugh Sebag-Montefiore, Somme: Into the Breach (London: Viking, 2016), pp. 472-473
Tim Cook, “The Politics of Surrender: Canadian Soldiers and the Killing of Prisoners in the Great War,” Journal of Military History, vol. 70, no. 3 (July 2006), pp. 637-665.
Sources for images and maps as noted above.
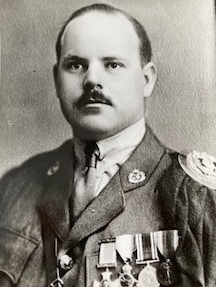 Image 1. Maj Harry Hatch, 19th Bn Second in Command. (Argyll Regimental Foundation collection.)
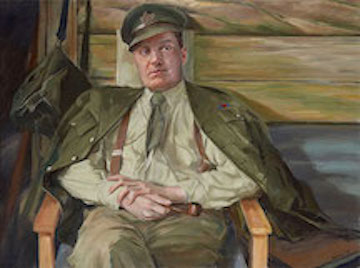 Image 2. LCol Lionel Millen, Commanding Officer, 19th Bn. (Argyll Regimental Foundation collection.)
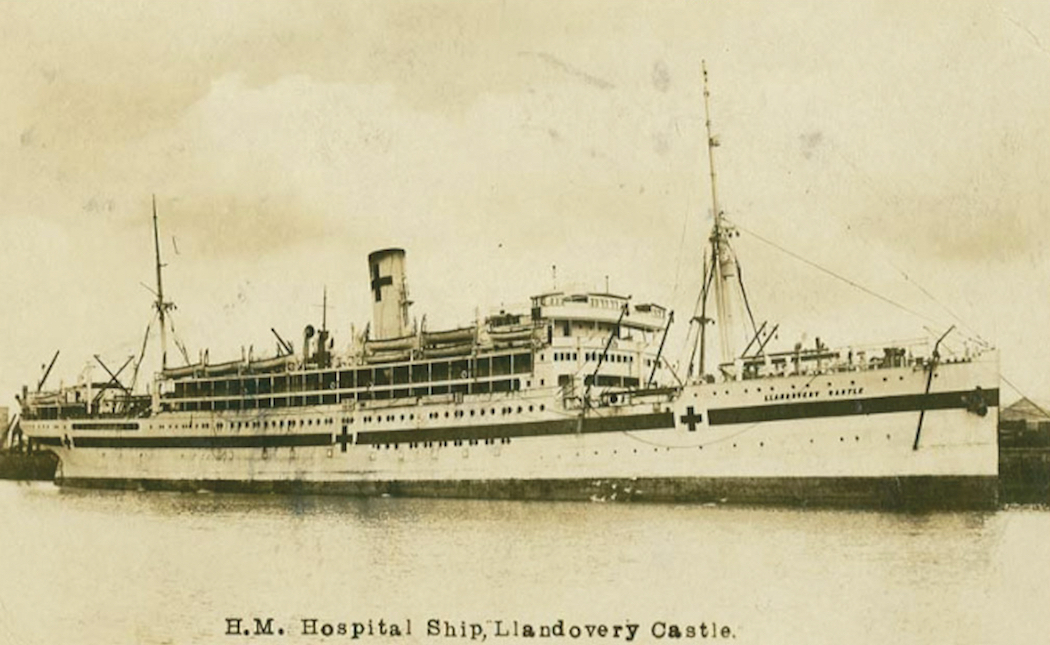 Image 6. Hospital ship Llandovery Castle, which was sunk by German U-boat U86 on 27 June 1918. (From thecanadianencyclopedia.ca.)
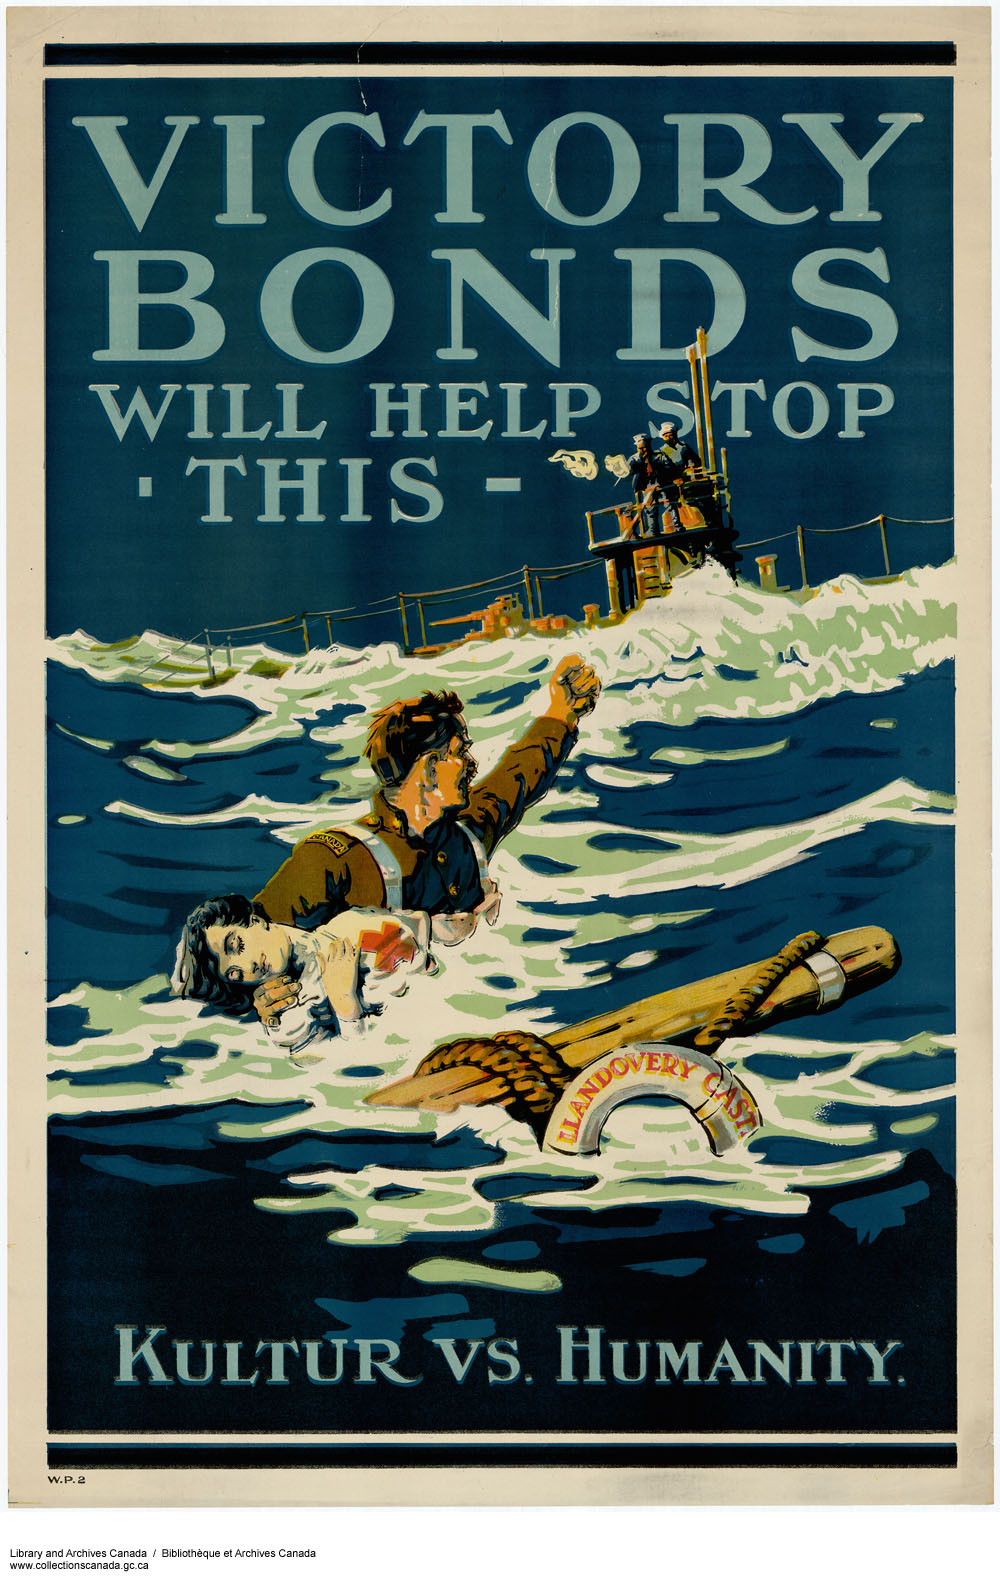 Image 7. A war bond poster designed to capitalize on the public anger surrounding the sinking of Llandovery Castle and the loss of life, including all 14 nursing sisters on board. (Library and Archives Canada.)
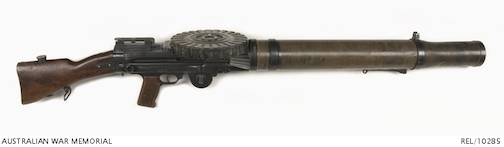 Image 8. A Lewis machine gun of the same type used by the Australian 21st Bn in support of the Canadian 19th Bn along the railway spur. Also used by A/Sgt Hollidge as he cleared dugouts inside Marcelcave.
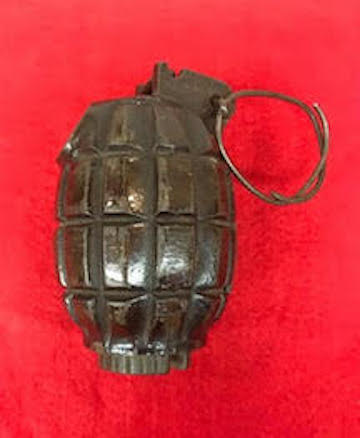 Image 9. A Mills bomb similar to those used by the Australians along the railway spur and by members of the 19th as they cleared dugouts inside the town. (Argyll Museum and Archives collection.)
 Image 10. A British Mk IV tank armed with two six-pounder guns and three Lewis guns similar to those in close support of the Canadian 19th Bn and elements of the Australian 26th Bn at Marcelcave. (Wikipedia.)
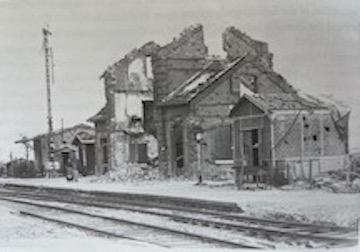 Image 11. The railway station at Marcelcave after the battle. (Library and Archives Canada PA-004533.)
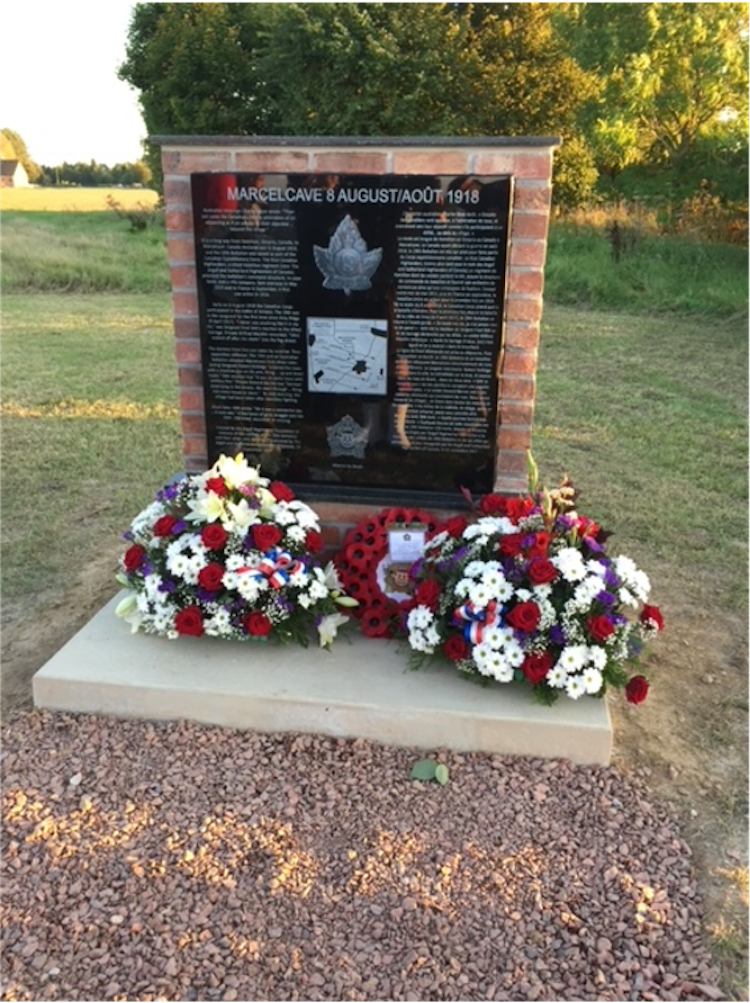 Image 12. The memorial to the 19th Bn, commemorating the capture of Marcelcave. Erected by the Argyll Regimental Foundation in 2017. (Author’s collection.)
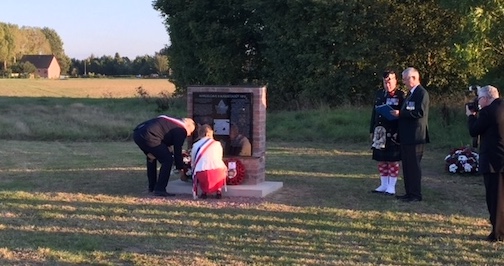 Image 13. Local French dignitaries laying flowers of remembrance at the 19th Bn’s memorial. The site of the memorial is positioned on the west side of the village along the approach used by the 19th Bn as they attacked Marcelcave. (Author’s collection.)