The 19th Battalion’s Combined Arms Triumph: Rieux-en-Cambresis, 10–11 October 1918
LCol (ret) Tom Compton, CD, BA
Director, Argyll Regimental Museum & Archives
The common image of the First World War is of a long slug match in waterlogged trenches, and soldiers fighting an almost subterranean conflict. The last 100 Days of the war, however, saw far more movement on the Western Front, thanks in part to the relentless advance of the British, Canadian, and Australian armies. The determination of the Allies did not fully explain their successes as the tactics and techniques of 1914–1916 had given way to new technologies, scientific staff work, and the practiced coordination of units and formations in the field. By August 1918, the Allied armies had developed modern tactics, techniques, and procedures in concert with emerging technologies and, significantly, the prowess of British, Canadian and Australian units and formations in the field. The Allies had learned how to adapt and, through some trial and error as well as imaginative leaders at the unit level, had built formations capable of far more than the 19th-century attrition mindset of the Somme battlefields. The elements of success as listed above were available and sometimes clumsily coordinated, but on occasion they came together in an effective and dynamic force that pushed the heavily degraded German army back towards their own borders.
On 10 October 1918, the 19th Battalion was involved in the launch of the Third Army’s campaign south of Cambrai. The 4th Canadian Infantry Brigade had been in support of the 5th and 6th Brigades initially, but found it assigned the objective of the village of Naves after the 5th Brigade was depleted battling the wire entanglements and dug in Germans for the same objective.
The 19th assembled along its start line west of Naves, France, along a rail spur, at 0330 hours on 10 October (see Figures 2 and 3). At 0530 hrs, the Allied advance continued and the 19th cleared Naves against relatively light resistance with “only ten casualties” firing rifles and machine guns into houses as they advanced. By 0835 hrs, the battalion had reached its objective on high ground to the northeast, and by 1100 hrs Maj Hatch (Figure 1), in command of the battalion during this operation, had pushed patrols across the Erclin creek, finding crossing points for the rest of the battalion. The 4th Brigade Commander, on hearing of the 19th’s successes, ordered a continuation of the advance beyond the Erclin to the sunken road approximately 500 yds beyond. The 2nd Bn Canadian Machine Gun Corps was in support of the 19th as it advanced and suppressed most of the German fire as C and D Companies took the lead.
By 1430 hrs, both companies had attained their objectives, but they had advanced beyond the supporting fire of field artillery units. Despite the support of the 2nd Bn CMGC, D Coy of the 19th Bn on the left received heavy German machine gun fire causing casualties. During that afternoon, the 19th witnessed the last ever cavalry charge by the Canadian cavalry in the direction of the town of Iwuy. Cpl Deward Barnes of the 19th commented on the beautiful yet tragic charge as the horses and riders swept over the creek and up the rise towards the Germans, only to be machine gunned down with heavy losses. A romantic form of warfare that had existed for centuries, armed men on horseback, was gunned down with the detached machinery of modern warfare that forever changed military conflicts.
By late afternoon of 10 October, the 19th Bn had taken all its objectives and linked up with British troops on their immediate right. A further push to occupy high ground 500 yds to their front was completed by 1945 hrs and marked the completion of an advance of 6,000 yds since the morning. That night saw the 19th Bn remain in its location with patrols pushed forward to provide early warning of an enemy attack.
After the 19th’s impressive gains on 10 October, they were due for relief. The British 146th and 147th Brigades would pass through and beyond the 19th and on their right to the east side of Iwuy, while the Canadian 6th Brigade was on the 19th’s left, with the task of capturing Iwuy itself. The next phase of the operation commenced at 0900 hrs on 11 October, with the West Yorkshire Regiment from the 146th Bde passing over the 19th and taking its objectives by 1000 hrs. The Germans were reportedly conducting a broad withdrawal, but at 1030 hrs the Canadians came under heavy artillery fire. The 19th Bn troops were sheltering along the road across their front. “It was awful,” Deward Barnes recalled:
“This was a hard road. I had no funk hole, so I got into the gutter. My back was on a level with the road. The shells would come straight down the road. Overhead [there were exploding] shells and shells that did not explode until they hit [the ground], making only a small hole and bouncing down the road, sometimes half a shell. It would make an awful noise twisting through the air. Men were cut to pieces in the funk holes which were higher than the road.”
The men of the 19th took cover between 1030 and 1100 hrs from the artillery fire, and the British formations took the brunt of a German infantry counter attack by five battalions of the 370th and 371st Regiments. More alarming was the appearance of German A7V tanks and captured British Mark IV tanks operated by the German 1st and 13th Panzer Detachments. Elements of the German 18th Reserve Division also suddenly joined in charging towards the British and Canadians. The appearance of the German tanks and charging infantry forced a withdrawal by the 146th and 147th Brigades as well as elements of the Canadians. Many of the British infantry withdrew to the 19th Battalion’s position and took shelter. Deward Barnes speculated that the British were relatively inexperienced because of their parade ground-like advance, which resulted in them breaking and withdrawing to the 19th’s positions once exposed to machine gun fire.
The Tide of Battle Turns
The British needed conspicuous leadership and here they found it in Maj Hatch, who rode with his batman on horseback up and down the line, rallying the troops. Canadian officers took this opportunity with Hatch’s example and rallied the British and Canadian troops in repelling the German attacks. Thousands of intermixed Canadian and British troops surged forward. Capt Shiel, commanding A Company, gathered the Lewis guns of both A and C Companies and, moving to their left flank, poured automatic fire into the Germans. Lt Vincent Crombie of the 19th Bn found an abandoned German anti-tank rifle on the ground and opened fire on the leading tank, an A7V. The armour-piercing rounds disabled the tank’s treads, stopping its advance, and it is believed the crew abandoned the armoured vehicle, withdrawing to their own lines. German infantry could not advance further under the storm of Lewis gun and rifle fire. Concurrently, a battery of Canadian field artillery galloped onto the scene as well as the Vickers guns of the 2nd Canadian Motor Machine Gun Brigade, compelling the surviving Germans to fully retreat.
The 19th was pulled back by Major Hatch to the road it had previously occupied and reverted to a reserve role for the remainder of the day, having exhausted all ranks in repelling the German attack. The cost for the past few days was 4 officers wounded, 1 missing, and 139 other ranks killed or wounded. This amounted to the vast majority of 19th Bn casualties for the month of October.
Combined Arms Success
Hatch’s personal leadership was a crucial factor in the successes of 11 October 1918, but the influence of a combination of cavalry, artillery, machine guns, and anti-tank weapons also played their part. Separately, they are powerful combat arms multipliers, but when used together, under resolute leadership, become dominant on the First World War battlefield. The events of 10-11 October were not necessarily unique in themselves, but they came together at the right time during the 19th Battalion’s fight to rank as one of the more brilliant feat of arms by the 19th Bn.
We saw how the cavalry charge was tragically defeated on the 10th in the face of machine guns, and while the cavalrymen’s gallant efforts were ultimately for naught, it demonstrated how the 19th’s infantry knew better to employ contrasting tactics. The use of ground by advancing infantry was described by Deward Barnes as movement in smaller groups in an irregular advance so that the Canadians could avoid German fire by using the folds of the ground to take cover and maintain momentum of the attack. This contrasts with the British units on the scene, who formed up in straight lines and advanced carefully as if dressed-off on parade. In the face of heavy machine gun fire, the 146th and 147th Brigades withered and ultimately broke ranks to seek refuge among the Canadians.
Secondly, the use of Lewis machine guns on a flank created a wall of fire the German infantry could not withstand. This combined with the machine gun barrages of 2 CMMG made it impossible for German infantry to advance. Thirdly, the timely arrival of a battery of Canadian field artillery increased the tempo and ferocity of the Canadian response so that even the 1st and 13th Panzer Detachments could not withstand the fire of the artillery’s 18-pounder quick-firing guns. Fourthly, the opportune discovery by Lt Crombie of a German anti-tank rifle allowed the infantry to reach out and disable a 60,000 lb beast with between 10 and 30mm of armour. One man with a heavy-calibre rifle against a 3.3 m high monster firing cannons and machine guns. The use of modern anti-tank weapons against tanks has been described by some historians as the death knell of tanks since any infantryman trained to use an anti-tank weapon, and with sufficient intestinal fortitude, can defeat a multi-million-dollar modern armoured vehicle. This was the case, in nascent form, with Crombie. Finally, the mobility of the Canadian Motor Machine Gun Brigade vehicles and Vickers guns created an element of mobility and firepower later seen perfected in Second World War formations such as the Argylls in 4 Canadian Armoured Division. All of these elements are described in modern parlance as a combined arms team. While this term was not used in the context of the First World War, it was certainly in use during the Second World War and has continued through to today. The stalemates of the Flanders battlefields had been turned to mobile warfare by what would later become the common trade of the Canadian Army of 1944–45.
The 19th Battalion at Rieux had benefitted from years of experience on the Western Front that saw the development of newer technologies, scientific staff work, and improved tactics. Combined with Maj Hatch’s personal leadership at the crucial point in the battle, they produced an ability to manoeuvre, protect infantry, and deliver crushing firepower with the combined arms available that day. The early days of drill and bayonet practice at Exhibition Camp in Toronto 1914 had given way to a seasoned battalion with leaders that could exploit the effects of combined arms on the battlefield of 1918 and defeat the enemy.
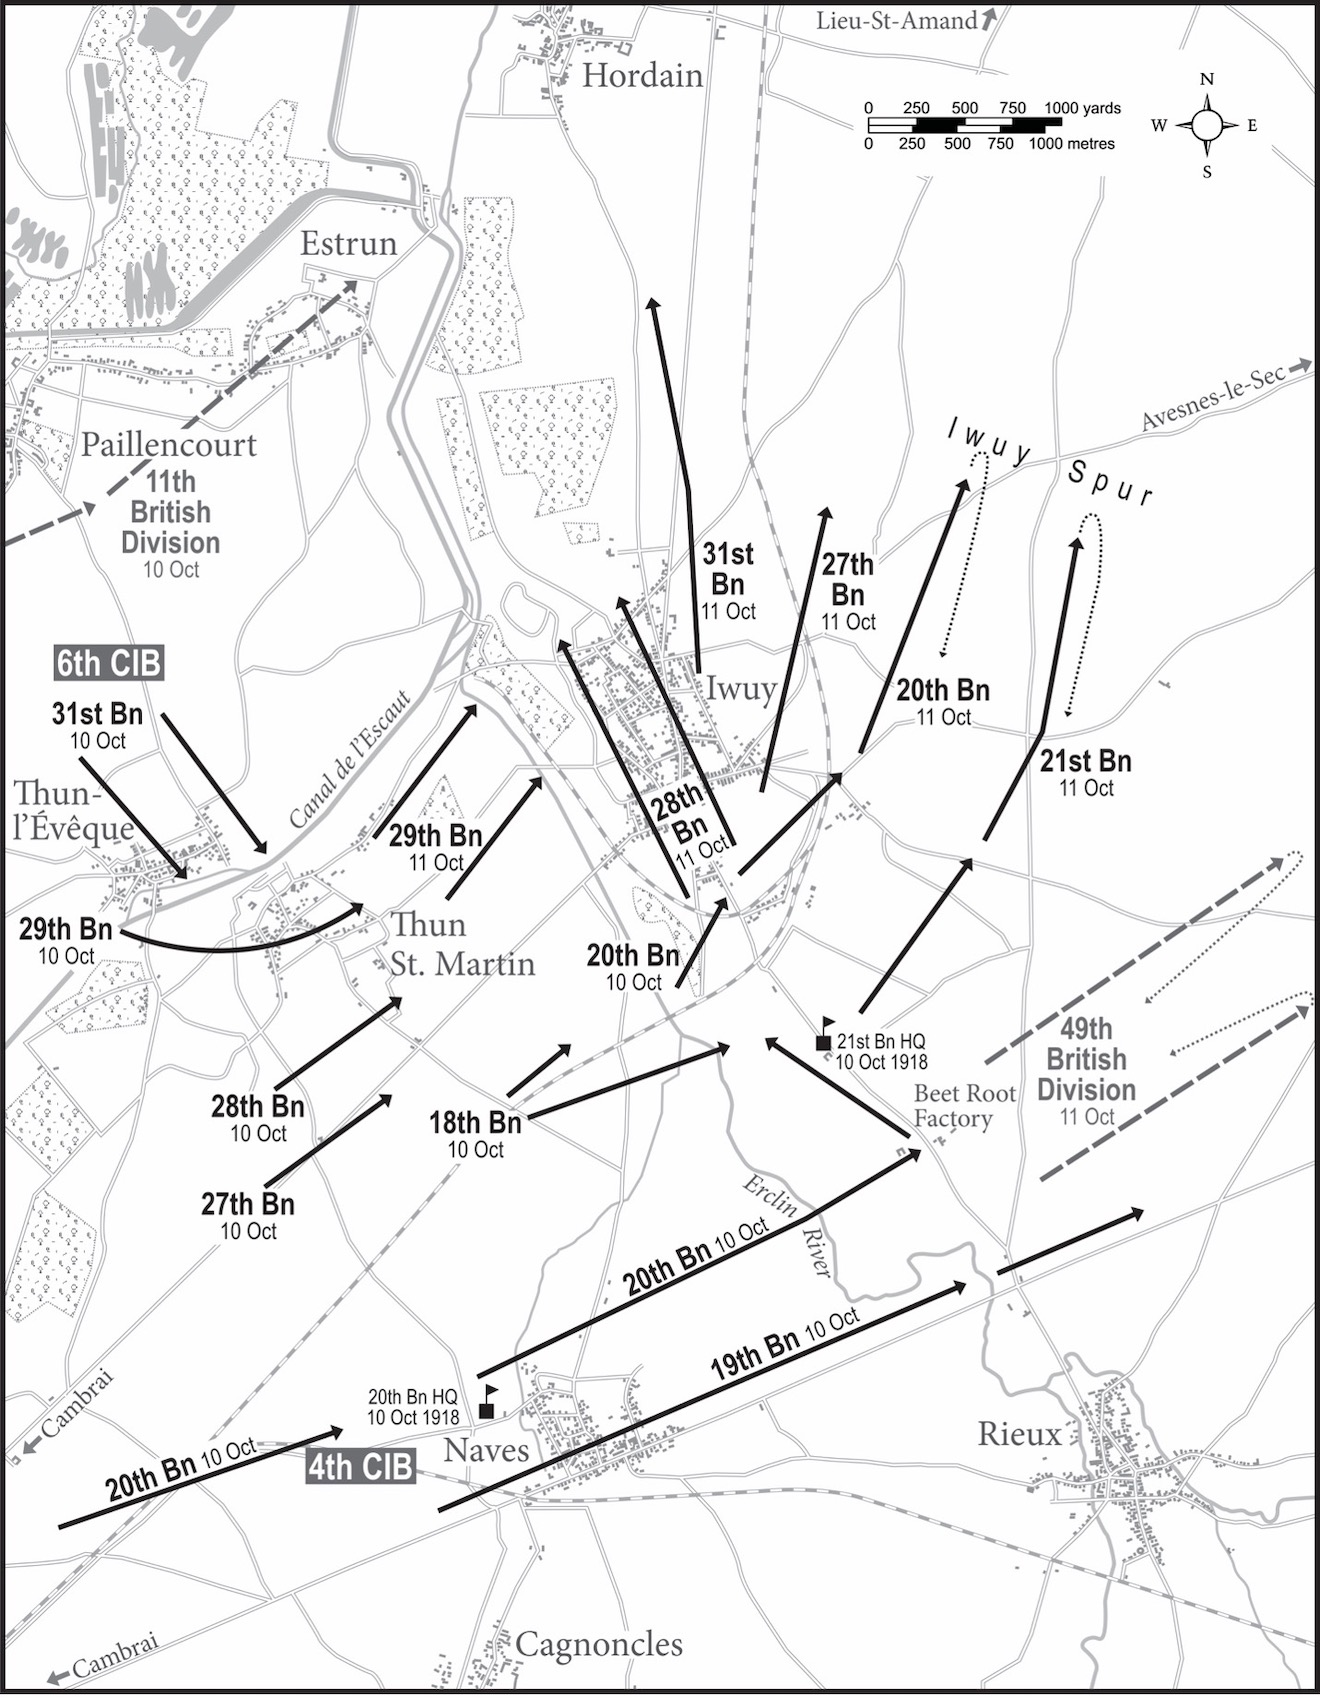 Figure 2. The battlefield on 11 October 1918
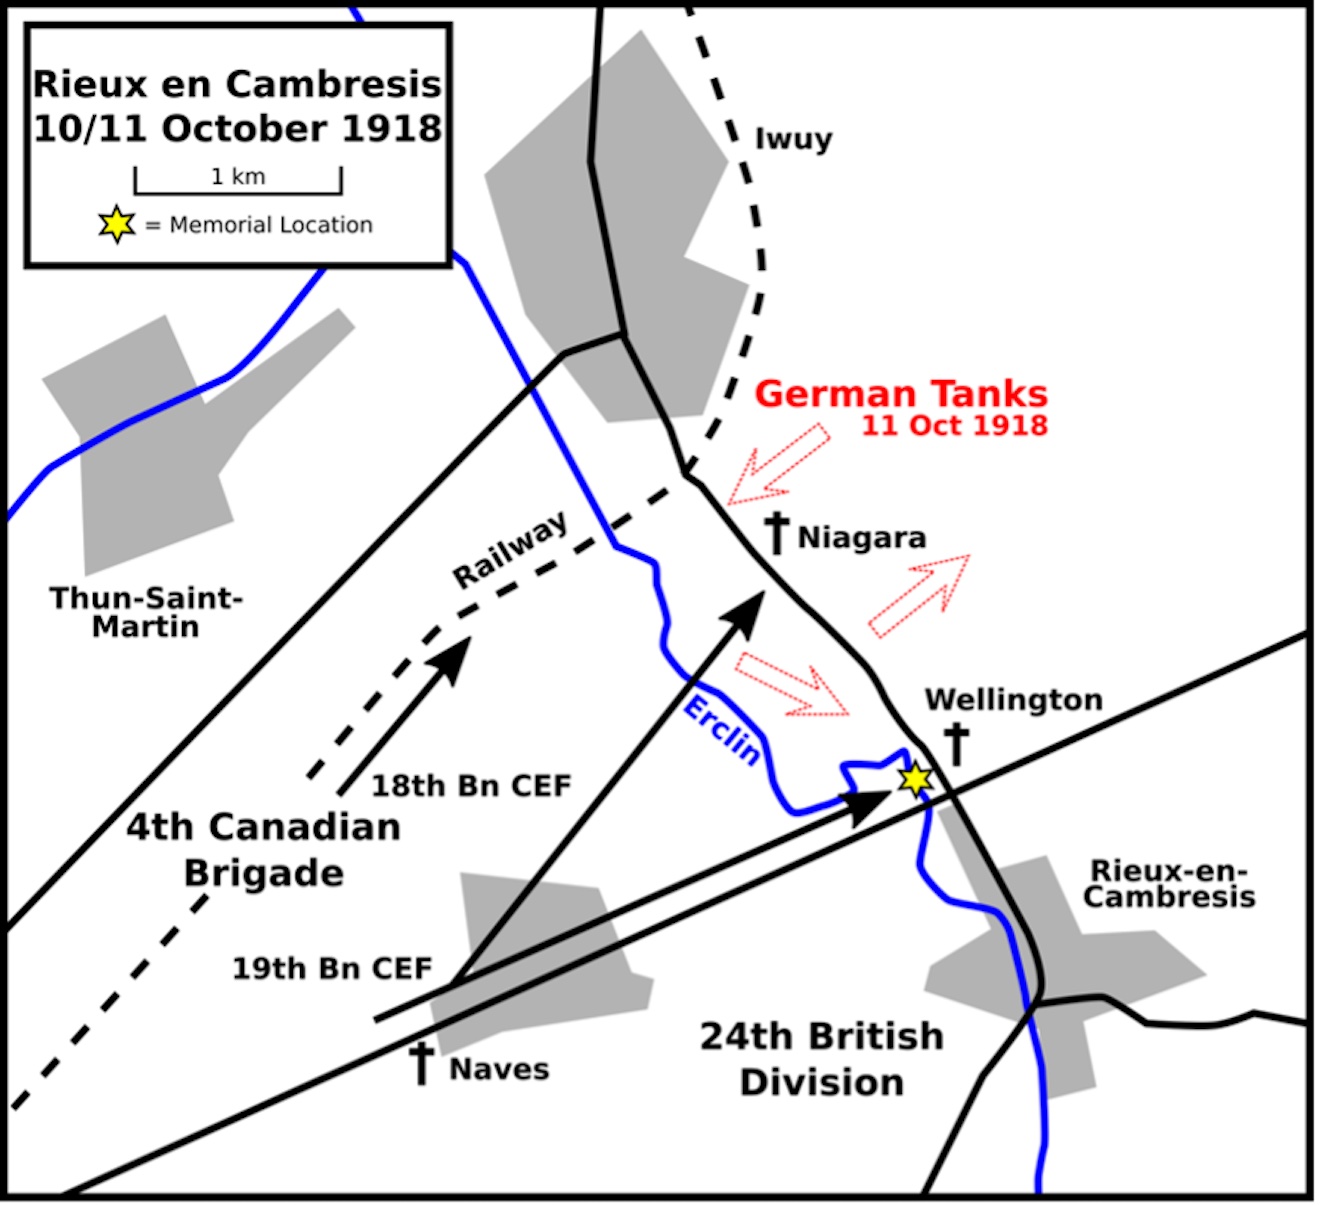 Figure 3. The same map depicted on the 19th Bn memorial featuring the positions of Wellington and Niagara cemeteries which contain the 19th’s dead from the action at Rieux.
Acknowledgements
Dr. David Campbell’s book It Can’t Last Forever, The 19th Battalion and the Canadian Corps in the First World War provided the majority of reference material.
Dr. Mike Bechtold provided a list of supplementary readings including: Michael McNorgan, Combined Arms Action at Iwuy; Jonathan Boff, Combined Arms during the Hundred Days Campaign, August-November 1918; Dougals E. Delaney, Mentoring the Canadian Corps: Imperial Officers and the Canadian Expeditionary Force, 1914-1918; Ian M. Brown, Not Glamorous, But Effective: The Canadian Corps and the Set-Piece Attack, 1917-1918; as well as the battlefield map featured at Figures 2 and 3.
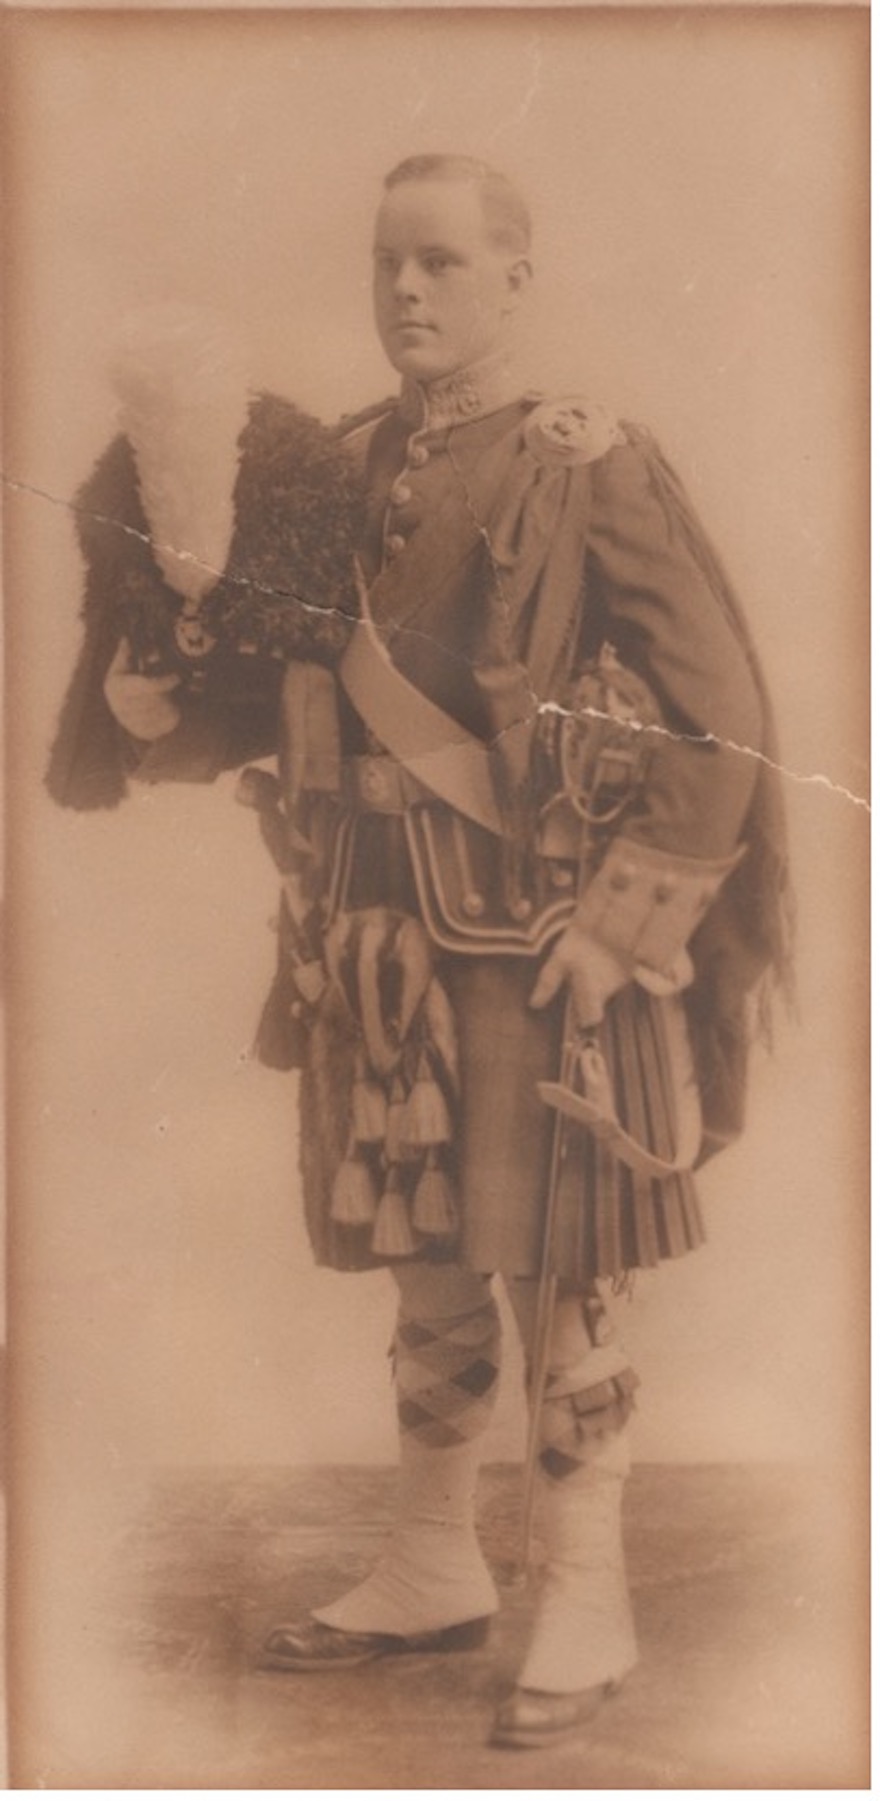 Figure 1. Lt Harry Hatch wearing a 91st Highlanders ceremonial uniform prior to the war. Hatch was in temporary command of the 19th Bn and was instrumental in rallying British and Canadian troops in repelling the German attack.
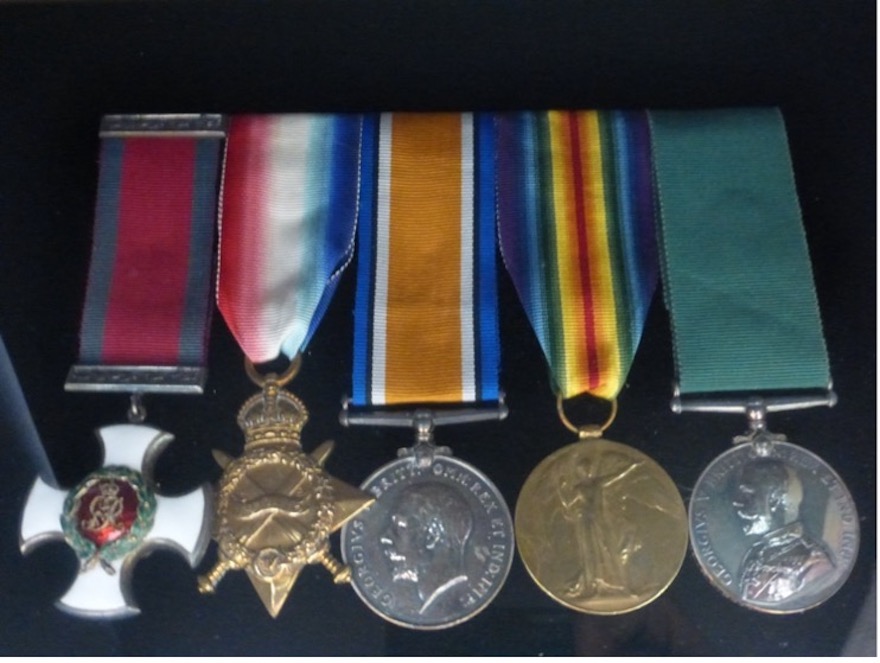 Figure 1A. The original medal set of Major (later LCol) Harry Hatch, DSO, held by the Argyll Museum and Archives. In order of precedence from left to right: the Distinguished Service Order, the 1914–1915 Star, the British War Medal 1914–1920, the Allied Victory Medal 1914–1919, and the Volunteer Officer’s Decoration.
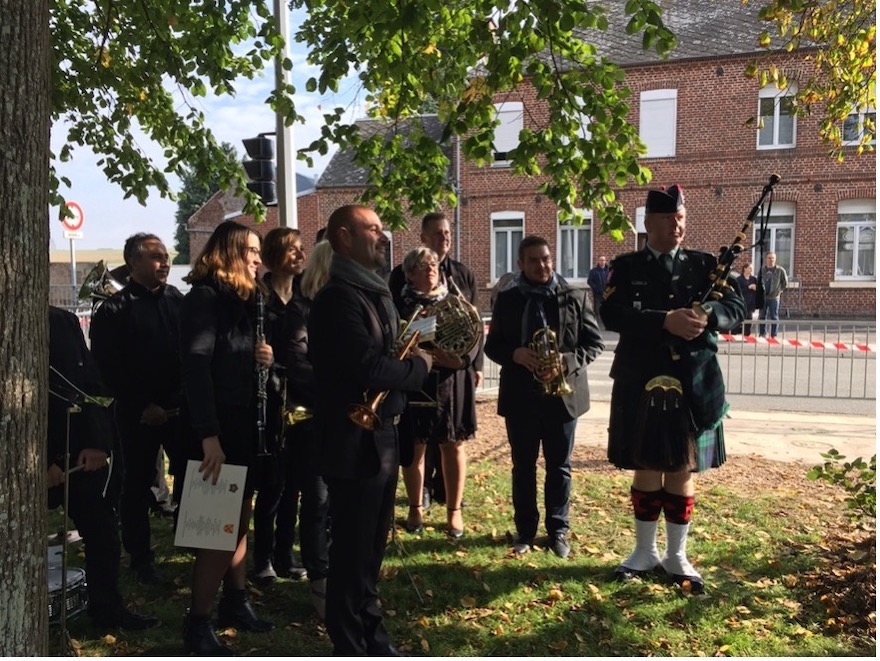 Figure 4. The musicians of the local municipal band and the Argylls’ MCpl (now Sgt) Cooper, who played during the dedication of the 19th Bn monument. The Rieux-en-Cambresis community response to our memorial dedication was overwhelming and clearly the largest of the Argylls’ 2017 trip.
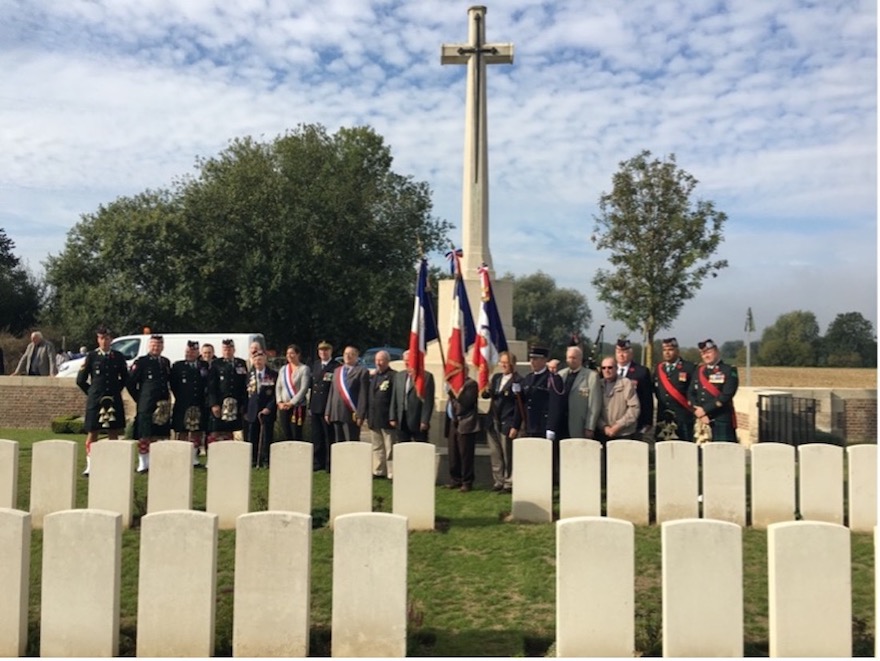 Figure 5. Niagara Cemetery with representatives of the Argylls, the local representatives, and at least one French National Assembly dignitary as well as French veterans of various conflicts.
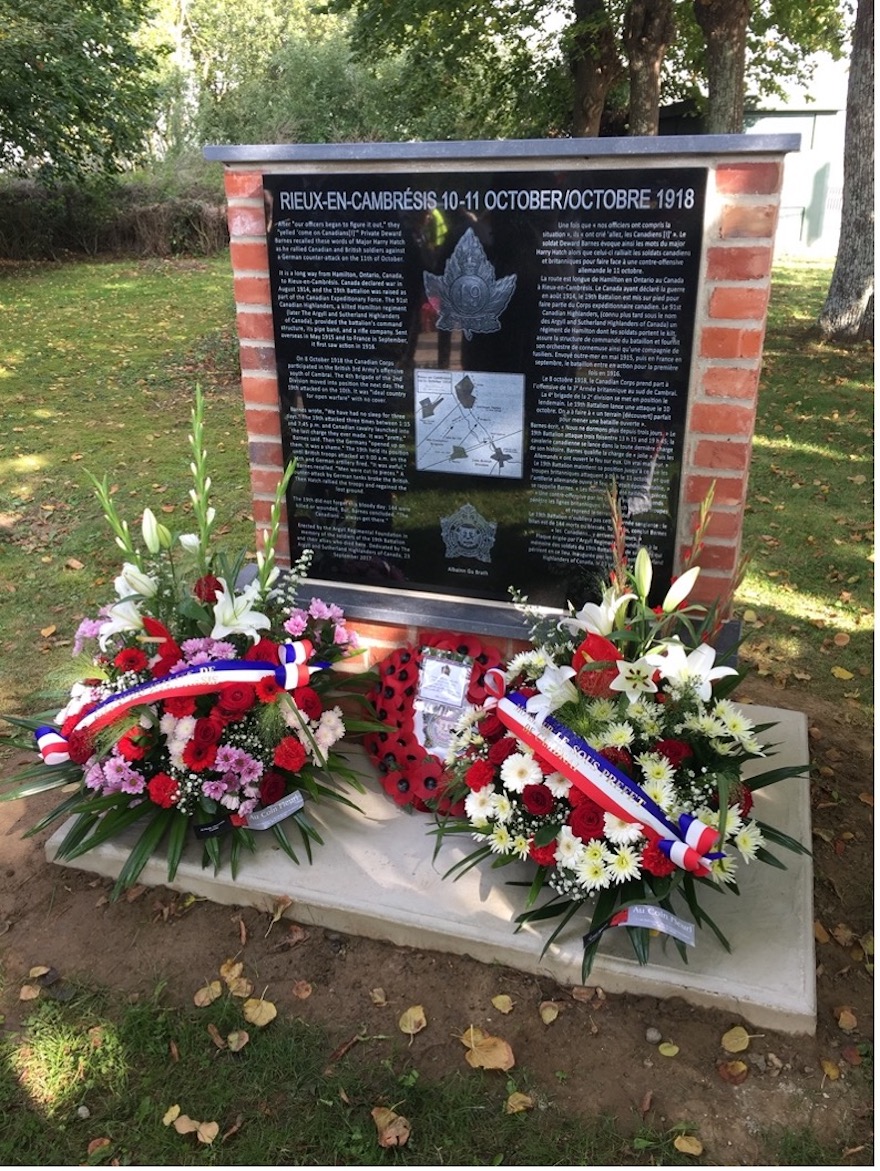 Figure 6. The Argyll Regimental Foundation Memorial to the 19th Battalion in Rieux-en-Cambresis, northern France.
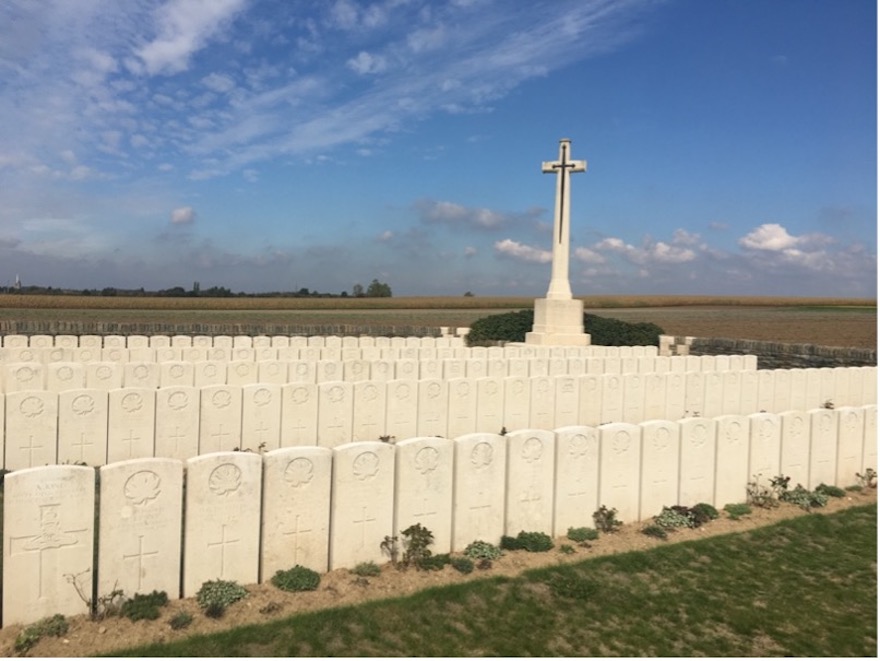 Figure 7. Niagara Cemetery graves of 19th Bn soldiers from the battle – and essentially the left flank of the 19th’s positions on 11 Oct 1918. The slight rise seen in background of Figures 7 and 8 give the reader a view of the ground over which German tanks and infantry attacked.
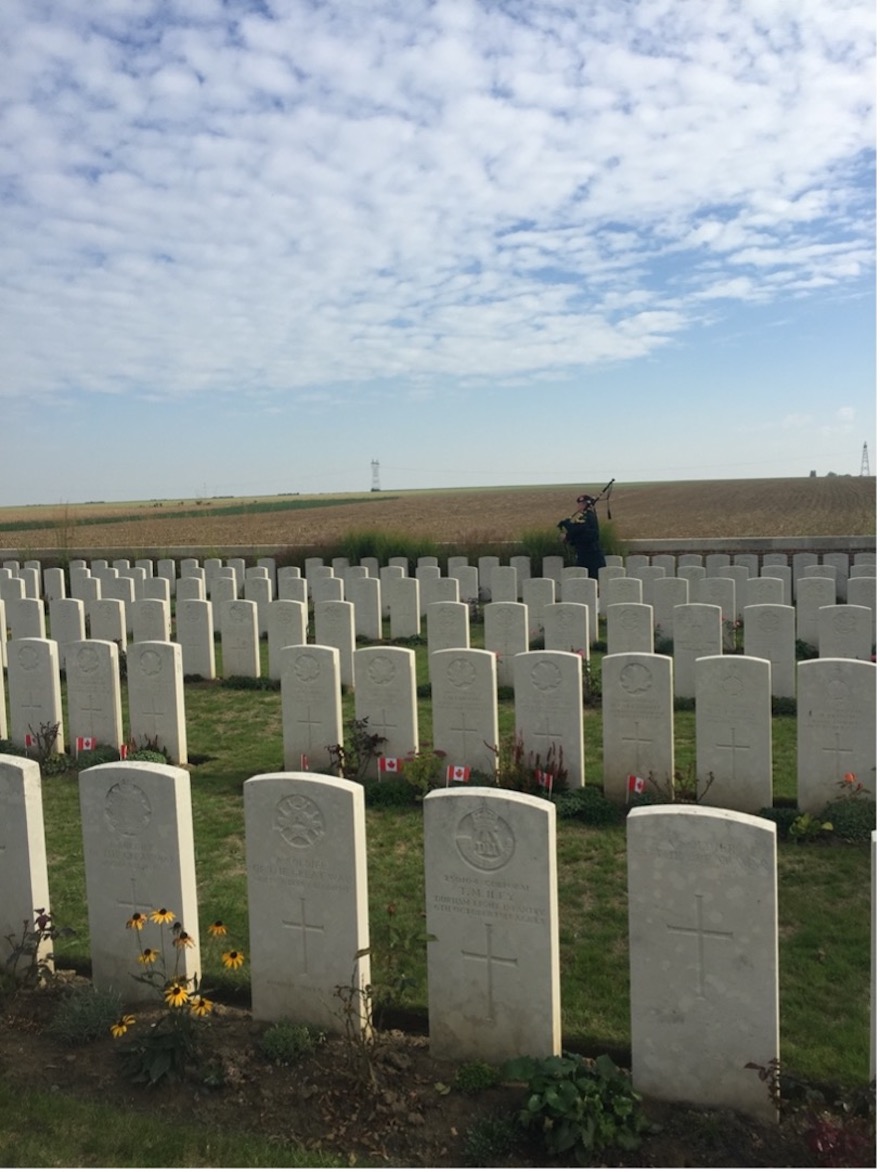 Figure 8. Wellington Cemetery, immediately adjacent to Rieux, contains the graves of 19th Bn soldiers from the battle. It also marks the right flank of the 19th Bn, 11 Octobert 1918. MCpl Cooper is in the middle ground as he plays the “Lament” over the graves of the 19th Battalion’s dead.